How To Use A Sewing Machine Step By Step
Learning to use a sewing machine can feel daunting at first glance.
I remember feeling overwhelmed by all the knobs and threads on my grandmother’s old Singer.
But with this practical guide, I’ll walk you through each step, making the process clear and achievable.
Quick Overview
This guide will transform you from a complete beginner into someone comfortable stitching basic seams. You’ll understand your machine’s essential parts, how to thread it, and how to sew your first straight line.
- Time needed: 1-2 hours for initial setup and practice.
- Difficulty: Beginner
- What you’ll need: Sewing machine, thread, fabric scraps, scissors, bobbins, seam ripper.
Step-by-Step Instructions
Step 1: Get to Know Your Machine
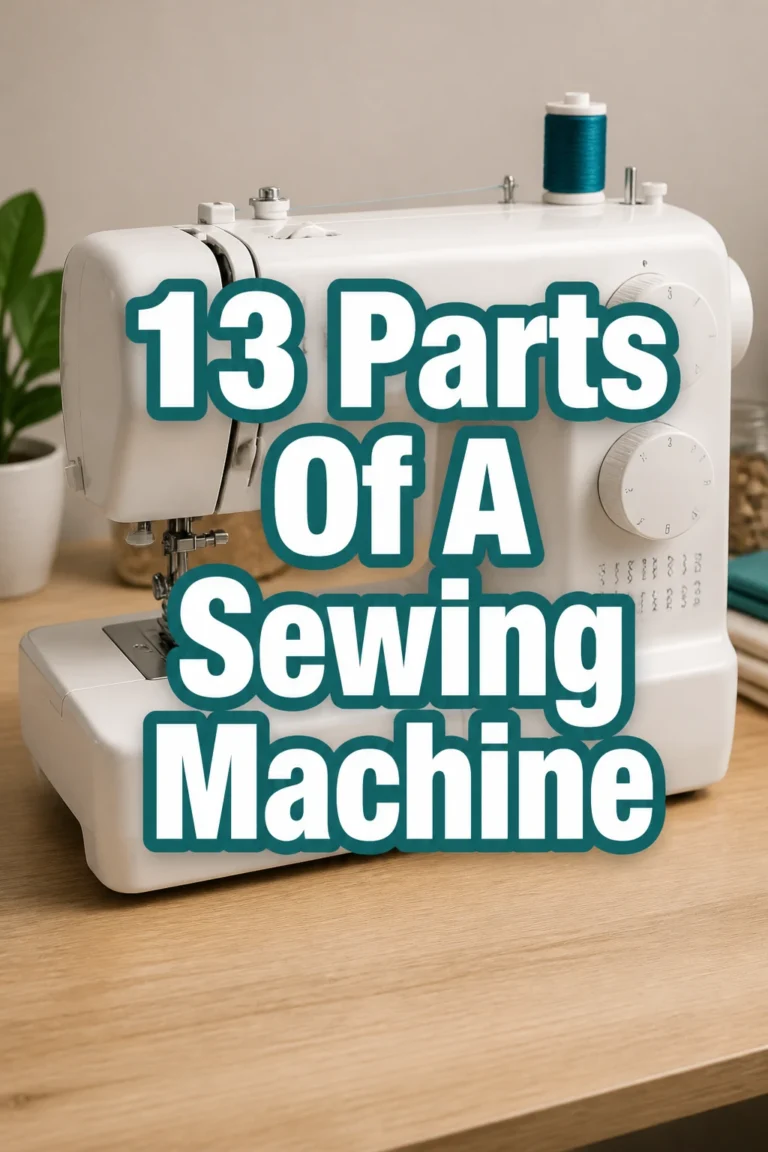
Before you even plug it in, take a moment to understand the different components of your sewing machine. Locate the main parts like the handwheel, bobbin winder, spool pin, tension dial, stitch selector, presser foot, needle, and foot pedal.
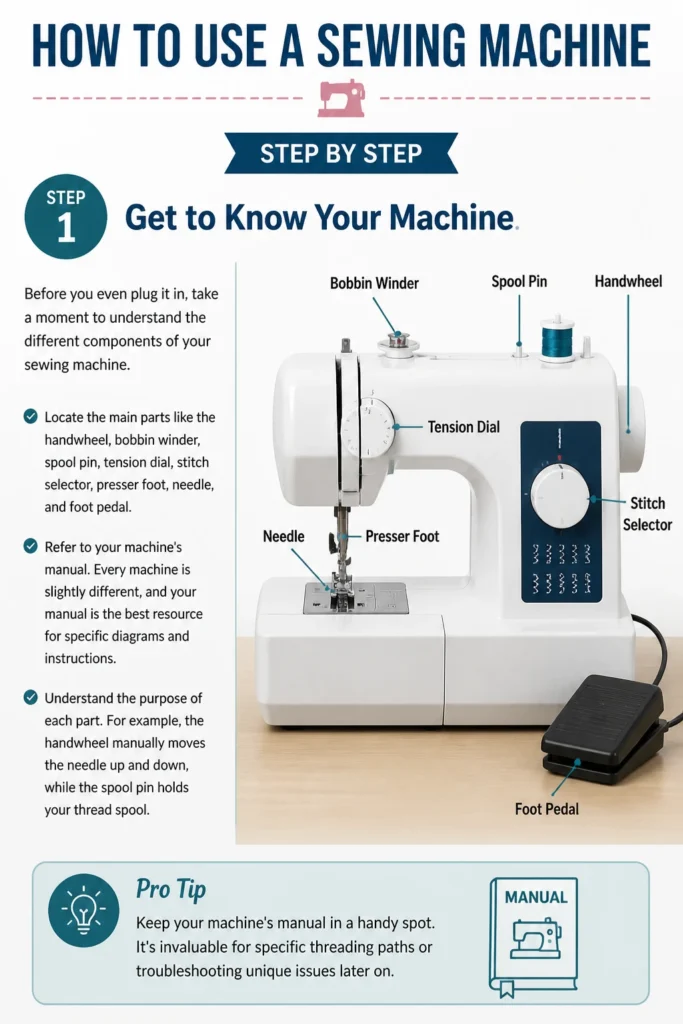
Refer to your machine’s manual. Every machine is slightly different, and your manual is the best resource for specific diagrams and instructions.
Understand the purpose of each part. For example, the handwheel manually moves the needle up and down, while the spool pin holds your thread spool.
Pro Tip: Keep your machine’s manual in a handy spot. It’s invaluable for specific threading paths or troubleshooting unique issues later on.
Step 2: Power Up and Position
Find a well-lit, stable surface for your sewing machine. Ensure there’s enough space around it for your fabric to move freely.
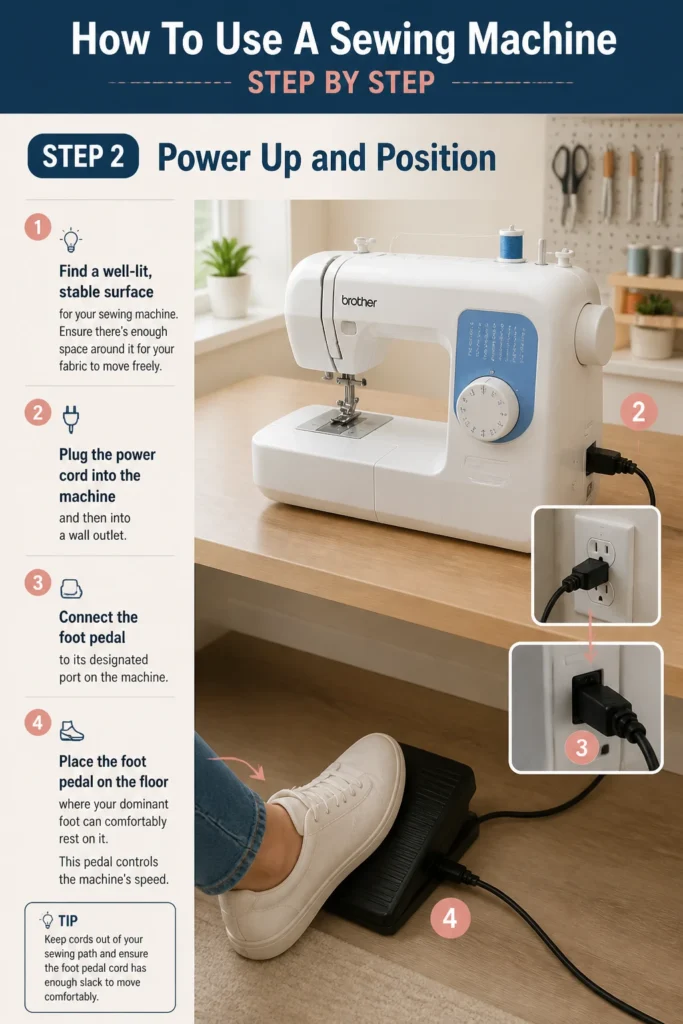
Plug the power cord into the machine and then into a wall outlet. Connect the foot pedal to its designated port on the machine.
Place the foot pedal on the floor where your dominant foot can comfortably rest on it. This pedal controls the machine’s speed.
Step 3: Wind the Bobbin
The bobbin holds the bottom thread, which interlocks with the top thread to form a stitch. You’ll need to wind thread onto an empty bobbin.
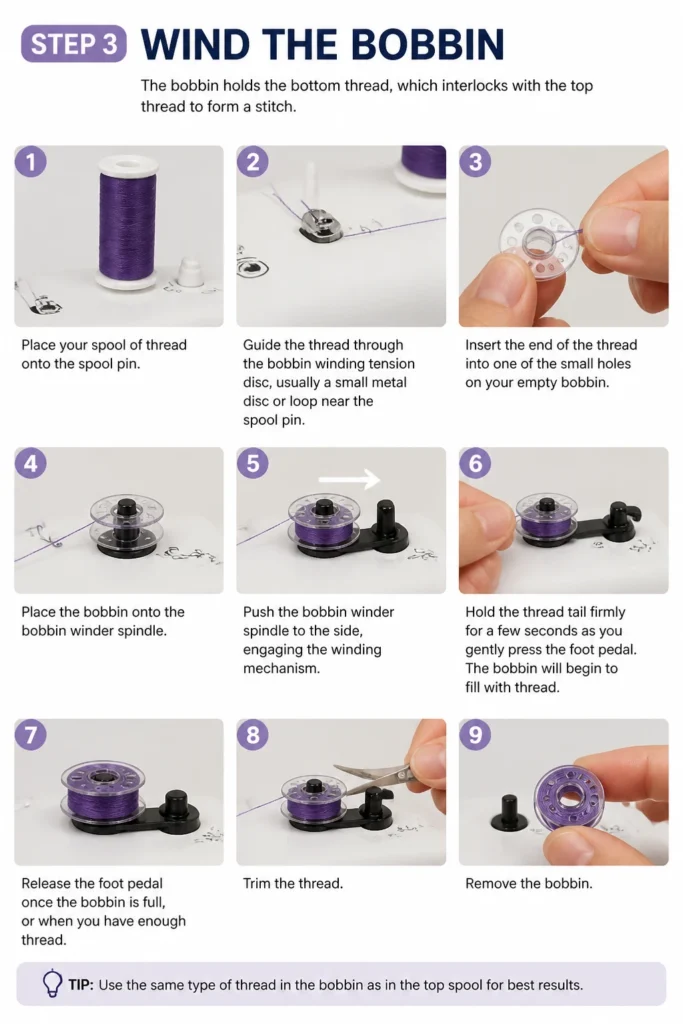
Place your spool of thread onto the spool pin. Guide the thread through the bobbin winding tension disc, usually a small metal disc or loop near the spool pin.
Insert the end of the thread into one of the small holes on your empty bobbin. Place the bobbin onto the bobbin winder spindle.
Push the bobbin winder spindle to the side, engaging the winding mechanism. Hold the thread tail firmly for a few seconds as you gently press the foot pedal.
The bobbin will begin to fill with thread. Release the foot pedal once the bobbin is full, or when you have enough thread. Trim the thread and remove the bobbin.
Step 4: Insert the Bobbin
Now that your bobbin is wound, it needs to be placed into its compartment. The bobbin compartment is typically located either under the needle plate (front-loading) or on the top of the machine (top-loading/drop-in).
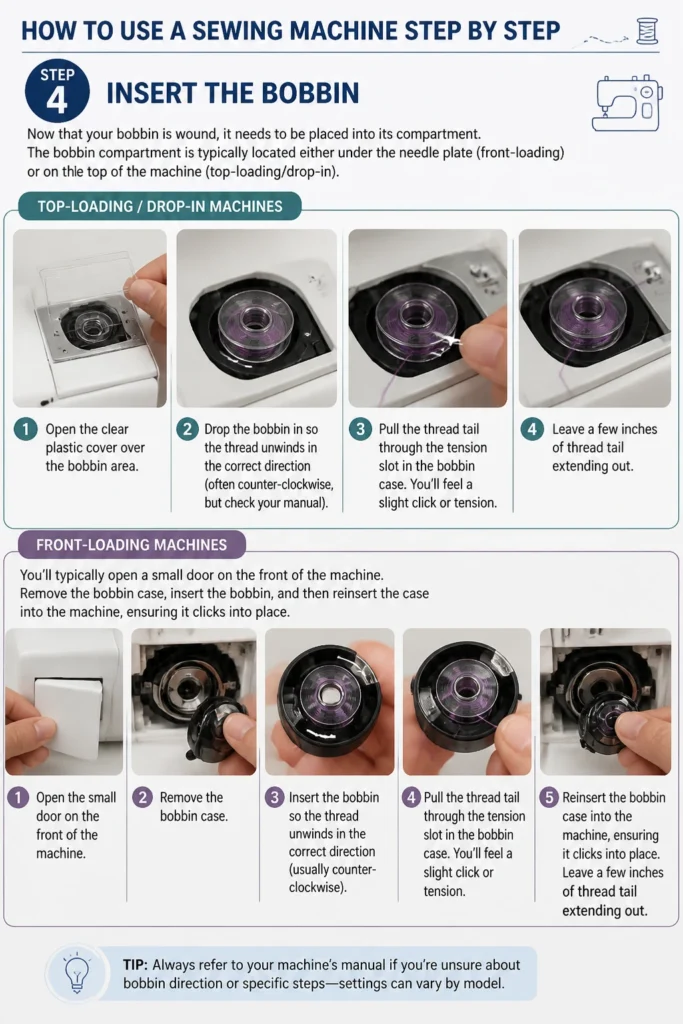
For top-loading machines, open the clear plastic cover over the bobbin area. Drop the bobbin in so the thread unwinds in the correct direction (often counter-clockwise, but check your manual).
Pull the thread tail through the tension slot in the bobbin case. You’ll feel a slight click or tension. Leave a few inches of thread tail extending out.
For front-loading machines, you’ll typically open a small door on the front of the machine. Remove the bobbin case, insert the bobbin, and then reinsert the case into the machine, ensuring it clicks into place.
Step 5: Thread the Upper Needle
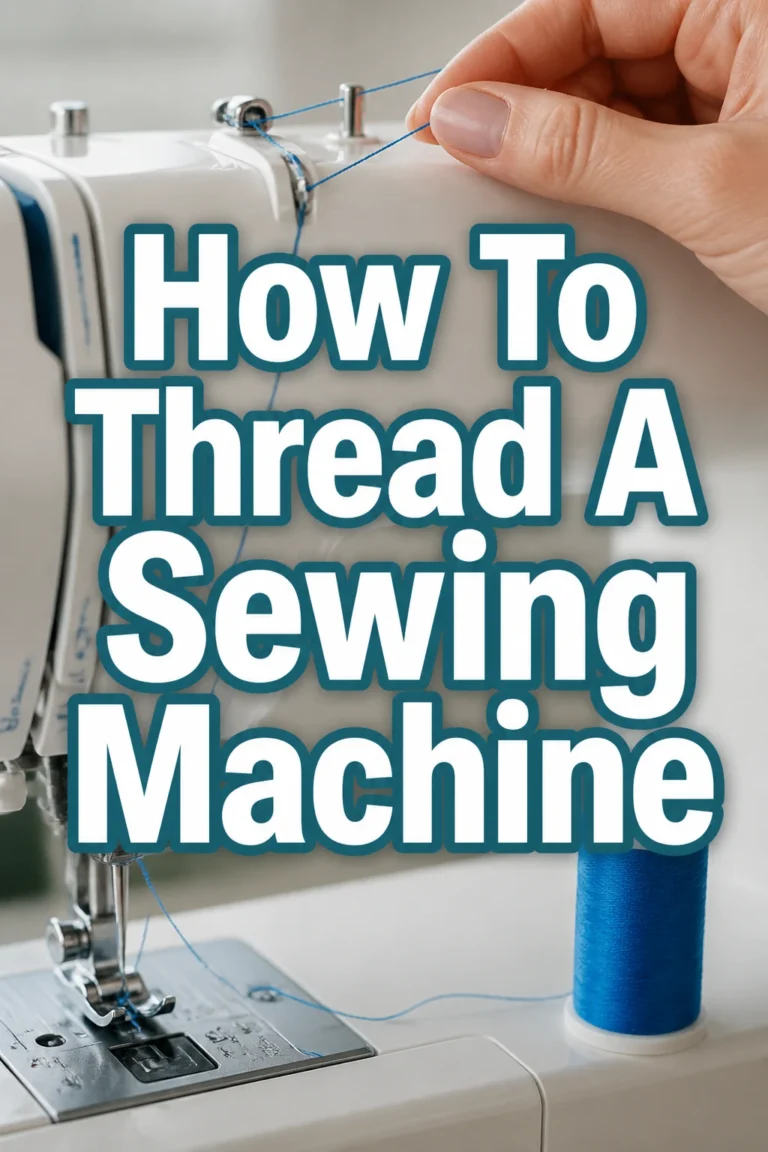
This step is crucial for proper stitching. Place your main spool of thread onto the spool pin. Ensure it’s unwinding smoothly.
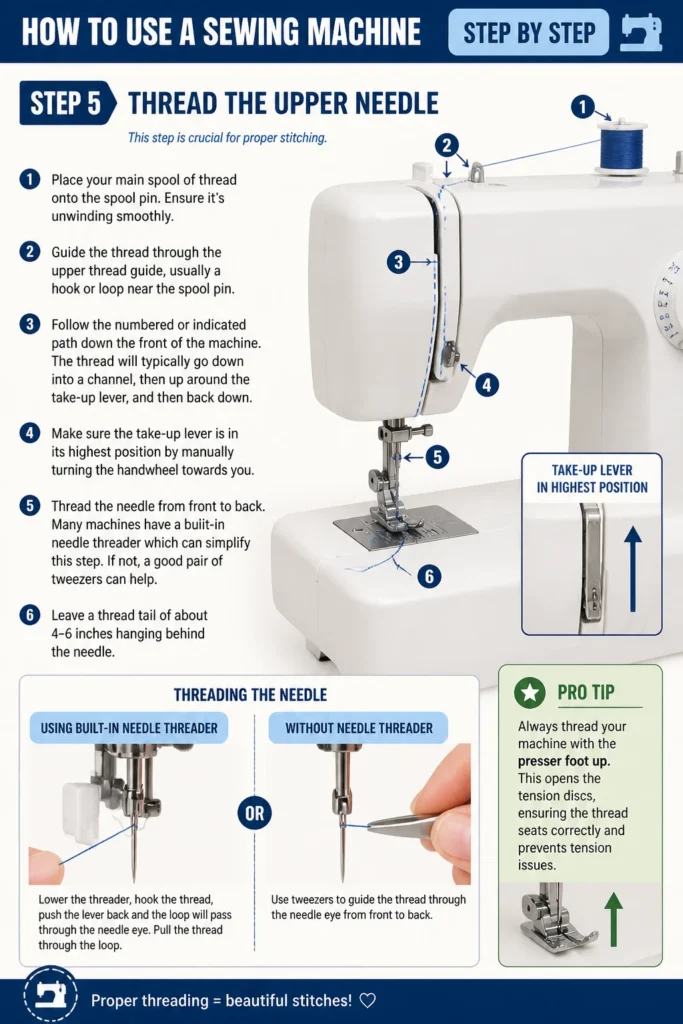
Guide the thread through the upper thread guide, usually a hook or loop near the spool pin. Follow the numbered or indicated path down the front of the machine.
The thread will typically go down into a channel, then up around the take-up lever, and then back down. Make sure the take-up lever is in its highest position by manually turning the handwheel towards you.
Thread the needle from front to back. Many machines have a built-in needle threader which can simplify this step. If not, a good pair of tweezers can help.
Leave a thread tail of about 4-6 inches hanging behind the needle.
Pro Tip: Always thread your machine with the presser foot up. This opens the tension discs, allowing the thread to seat correctly. If the presser foot is down, the thread won’t be properly tensioned.
Step 6: Bring Up the Bobbin Thread
You now have the top thread through the needle and the bobbin thread in its compartment. These two threads need to meet.
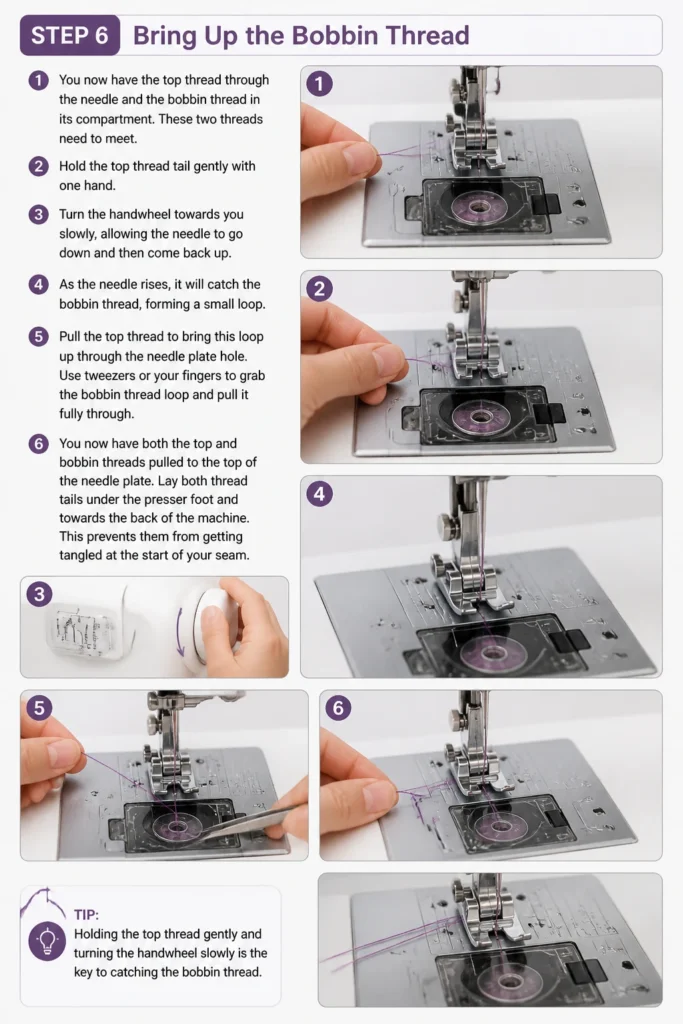
Hold the top thread tail gently with one hand. Turn the handwheel towards you slowly, allowing the needle to go down and then come back up.
As the needle rises, it will catch the bobbin thread, forming a small loop. Pull the top thread to bring this loop up through the needle plate hole.
Use tweezers or your fingers to grab the bobbin thread loop and pull it fully through. You now have both the top and bobbin threads pulled to the top of the needle plate.
Lay both thread tails under the presser foot and towards the back of the machine. This prevents them from getting tangled at the start of your seam.
Step 7: Prepare Your Fabric and Stitch
Select a straight stitch on your machine’s stitch selector. Adjust the stitch length, usually between 2.0 and 2.5 for general sewing.
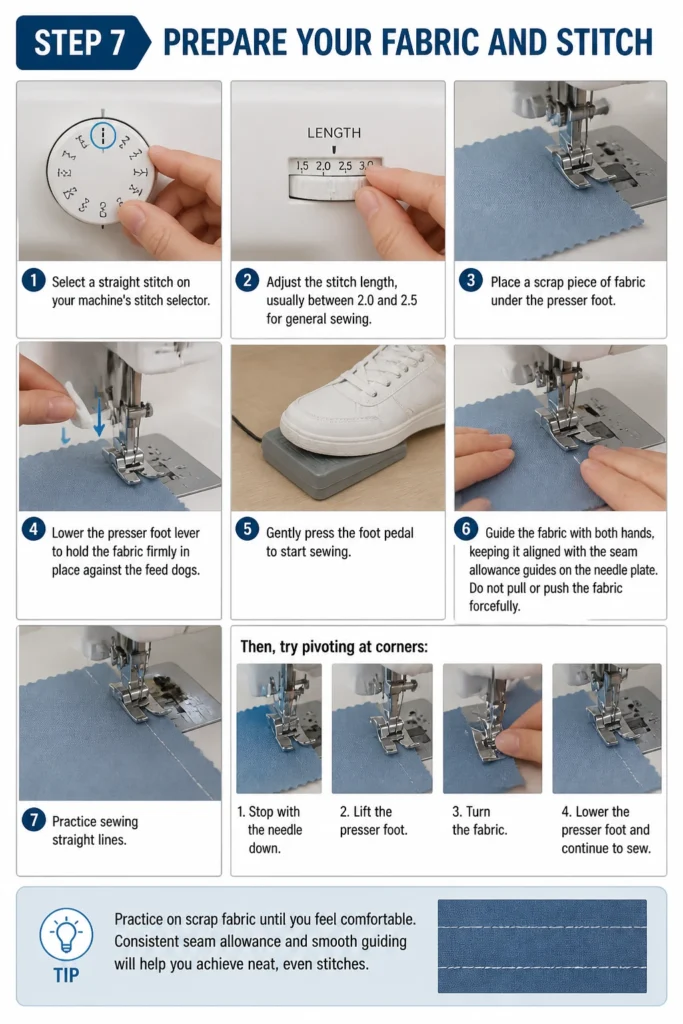
Place a scrap piece of fabric under the presser foot. Lower the presser foot lever to hold the fabric firmly in place against the feed dogs.
Gently press the foot pedal to start sewing. Guide the fabric with both hands, keeping it aligned with the seam allowance guides on the needle plate. Do not pull or push the fabric forcefully.
Practice sewing straight lines. Then, try pivoting at corners by stopping with the needle down, lifting the presser foot, turning the fabric, lowering the presser foot, and continuing to sew.
Step 8: Secure Your Stitches
At the beginning and end of every seam, you need to secure your stitches to prevent them from unraveling. This is called backstitching.
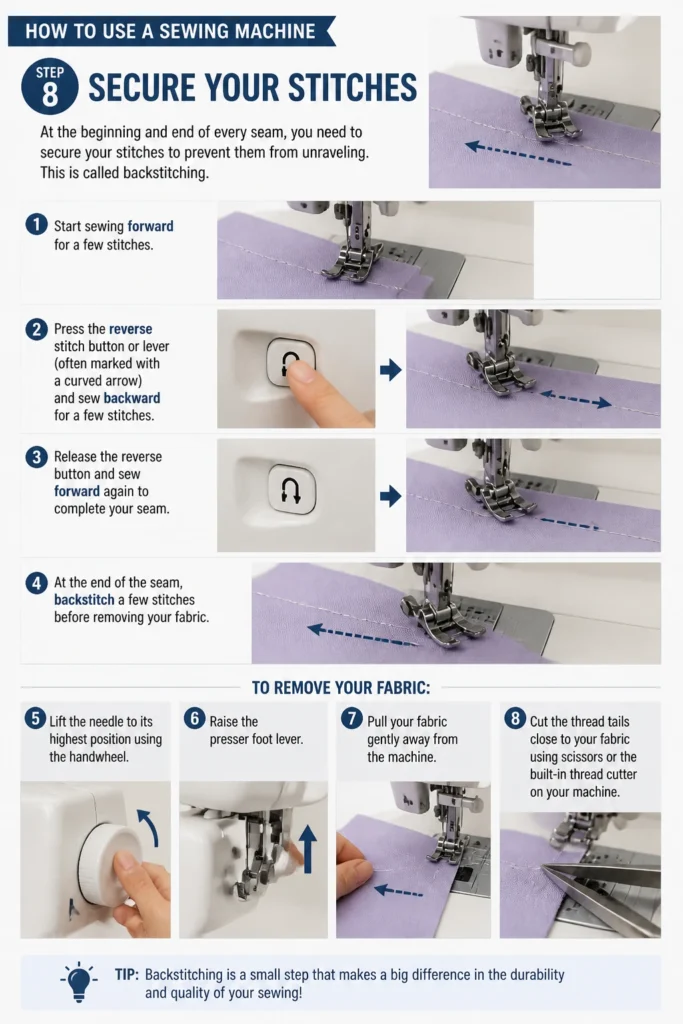
Start sewing forward for a few stitches. Press the reverse stitch button or lever (often marked with a curved arrow) and sew backward for a few stitches.
Release the reverse button and sew forward again to complete your seam. At the end of the seam, backstitch a few stitches before removing your fabric.
To remove your fabric, lift the needle to its highest position using the handwheel. Raise the presser foot lever. Pull your fabric gently away from the machine.
Cut the thread tails close to your fabric using scissors or the built-in thread cutter on your machine.
Common Mistakes to Avoid
Skipping the Manual
Many beginners jump straight into sewing without consulting their machine’s manual. This often leads to frustration with threading issues or not understanding basic functions. The manual is your machine’s unique instruction book; it explains specific threading paths and features that vary between models.
Incorrect Threading
Improper threading, especially the upper thread not passing through the take-up lever or the tension discs, is the most common cause of poor stitch quality. Always follow the thread path precisely and ensure the presser foot is up when threading to open the tension discs.
Forcing the Fabric
When sewing, never push or pull your fabric through the machine. The feed dogs beneath the presser foot are designed to move the fabric automatically. Forcing it can bend the needle, damage the machine, or result in uneven, stretched stitches.
Using the Wrong Needle
Sewing with a dull, bent, or incorrect needle for your fabric type can cause skipped stitches, fabric snags, or broken needles. Always use a sharp needle appropriate for your fabric (e.g., universal for general, ballpoint for knits, denim for heavy fabrics).
Troubleshooting
Skipped Stitches
Skipped stitches often indicate a problem with your needle. It might be dull, bent, or the wrong type for your fabric. Try replacing the needle with a new, sharp one appropriate for your material. Also, check your upper threading path; sometimes the thread can slip out of the take-up lever.
Thread Breaking
If your upper thread keeps breaking, check the tension setting; it might be too high. Also, inspect the thread path for any snags or frayed areas. A poor quality thread or a burr on your machine’s components can also cause thread breakage. Ensure your bobbin is wound evenly.
Fabric Bunching or Jamming
Fabric bunching or jamming typically points to an issue with the bobbin area or incorrect tension. Remove the fabric, clean out any lint from the bobbin case, and reinsert the bobbin correctly. Adjust the tension, starting with a neutral setting and testing on scrap fabric.
Key Takeaways
- Familiarize yourself with your sewing machine’s specific parts and consult its manual.
- Always wind your bobbin first and ensure both bobbin and upper threads are correctly inserted and tensioned.
- Practice on scrap fabric to get a feel for guiding the material and controlling speed with the foot pedal.
- Never force fabric through the machine; let the feed dogs do the work.
- Backstitch at the beginning and end of seams to prevent unraveling.
- Regularly change your needle and keep your machine clean for optimal performance.
Frequently Asked Questions
Why is my machine making a loud noise?
A loud or unusual noise often indicates a problem. First, check if the needle is bent or hitting the presser foot. Next, inspect the bobbin area for tangled threads or lint. Sometimes, the machine just needs a good cleaning and oiling, as per your manual’s instructions.
How often should I clean my sewing machine?
It’s a good practice to clean your sewing machine after every 8-10 hours of sewing, or after completing a major project. Lint and dust can accumulate in the bobbin area and feed dogs, affecting stitch quality and machine performance. Use a small brush, not canned air, to remove debris.
What type of thread should I use?
For most general sewing projects, an all-purpose polyester thread is a good choice. It’s strong and comes in a wide range of colors. For specialty fabrics, you might need specific threads like cotton for quilting, silk for fine fabrics, or heavy-duty for denim or canvas. Always match your needle to your thread and fabric.
Our Top Recommended Finds
- Good quality all-purpose thread: Essential for consistent stitches and fewer breaks.
- Variety pack of sewing machine needles: Ensures you always have the right needle for different fabric types and weights.
- Seam ripper: An indispensable tool for correcting mistakes without damaging your fabric.
Embark on Your Creative Journey
You now have the foundational knowledge to confidently use your sewing machine. Don’t be afraid to experiment with different stitches and fabric scraps.
Every stitch you make builds your skill and confidence. The world of creative possibilities, from mending clothes to crafting unique garments, is now open to you.
Grab your machine and some fabric today, and start bringing your textile visions to life!