How To Make A Tote Bag Sewing Patterns
There’s a unique satisfaction that comes from creating something with your own hands.
I remember feeling so proud the first time I drafted a tote bag pattern that perfectly fit my needs, from its ideal size to its sturdy straps.
This guide shares that hands-on experience, helping you craft your very own bespoke tote bag patterns from scratch.
Quick Overview
This comprehensive guide will walk you through the entire process of designing and drafting your own tote bag sewing patterns.
You’ll learn to translate your vision into precise, usable patterns, ready for cutting and sewing.
- Time needed: 3-5 hours (depending on complexity and prior experience)
- Difficulty: Beginner to Intermediate
- What you’ll need: Large paper, ruler, pencil, measuring tape, fabric, scissors, pins.
Step-by-Step Instructions
Step 1: Envision Your Ideal Tote
Before you draw a single line, take time to imagine your perfect tote bag. Consider its purpose: will it be for groceries, a laptop, or a beach day?
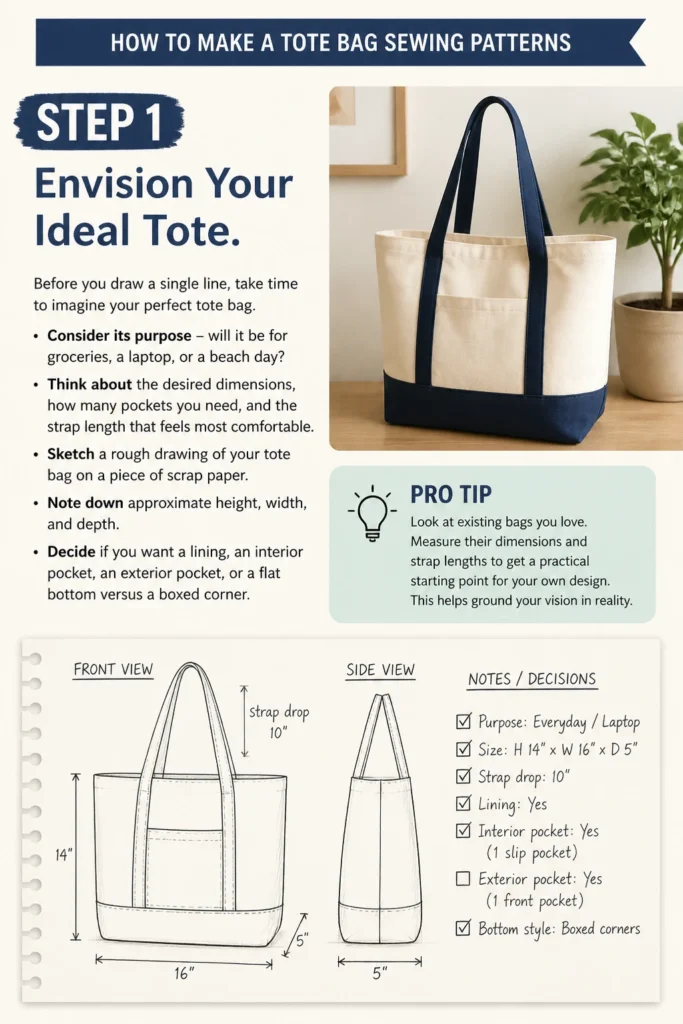
Think about the desired dimensions, how many pockets you need, and the strap length that feels most comfortable.
- Sketch a rough drawing of your tote bag on a piece of scrap paper.
- Note down approximate height, width, and depth.
- Decide if you want a lining, an interior pocket, an exterior pocket, or a flat bottom versus a boxed corner.
Pro Tip: Look at existing bags you love. Measure their dimensions and strap lengths to get a practical starting point for your own design. This helps ground your vision in reality.
Step 2: Gather Your Pattern-Making Tools
Having the right tools makes drafting accurate patterns much easier. Precision here saves frustration later on.
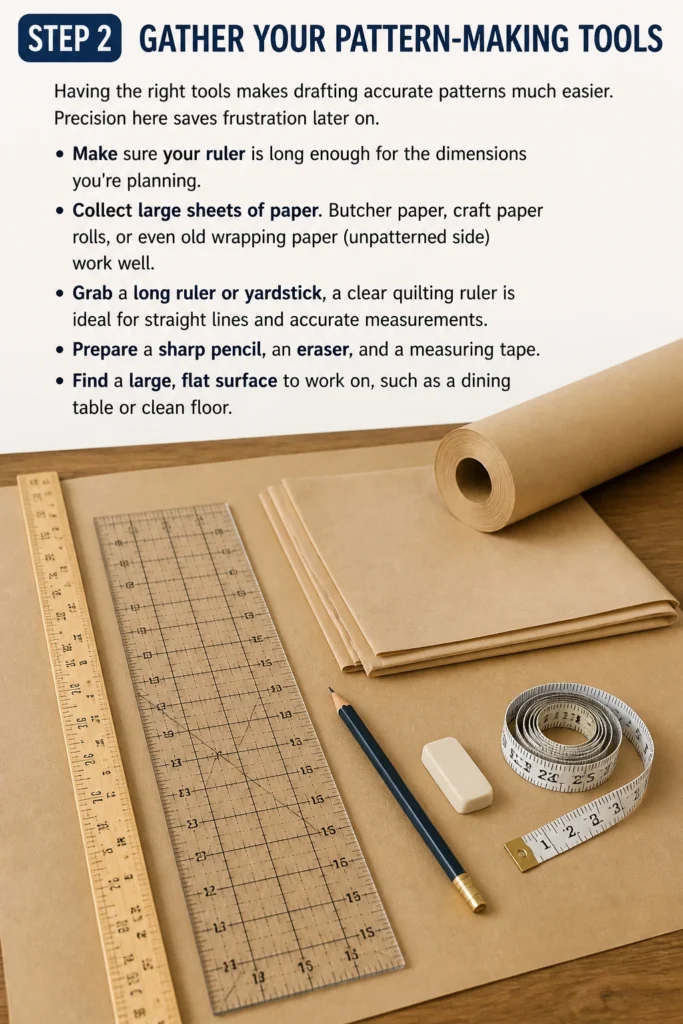
Make sure your ruler is long enough for the dimensions you’re planning.
- Collect large sheets of paper. Butcher paper, craft paper rolls, or even old wrapping paper (unpatterned side) work well.
- Grab a long ruler or yardstick, a clear quilting ruler is ideal for straight lines and accurate measurements.
- Prepare a sharp pencil, an eraser, and a measuring tape.
- Find a large, flat surface to work on, such as a dining table or clean floor.
Step 3: Draft the Main Body Piece
This is the foundation of your tote bag. We’ll typically draft one main piece that will be cut twice, or one piece that folds.
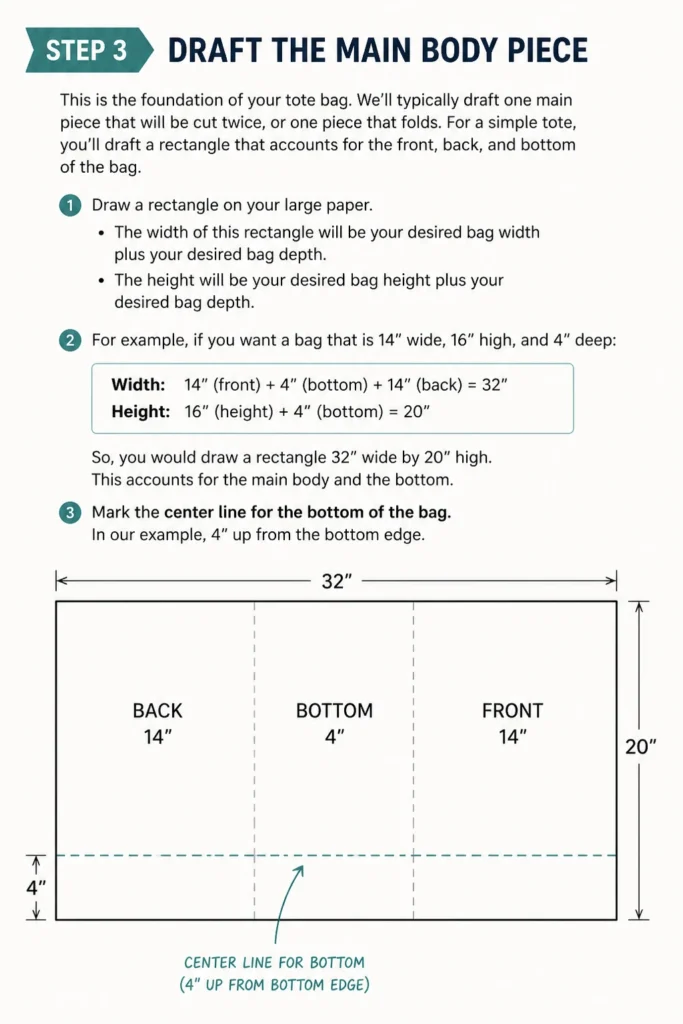
For a simple tote, you’ll draft a rectangle that accounts for the front, back, and bottom of the bag.
- Draw a rectangle on your large paper. The width of this rectangle will be your desired bag width plus your desired bag depth. The height will be your desired bag height plus your desired bag depth.
- For example, if you want a bag that is 14″ wide, 16″ high, and 4″ deep:
- Width: 14″ (front) + 4″ (bottom) + 14″ (back) = 32″
- Height: 16″ (height) + 4″ (bottom) = 20″
So, you would draw a rectangle 32″ wide by 20″ high. This accounts for the main body and the bottom.
- Mark the center line for the bottom of the bag. In our example, 4″ up from the bottom edge of the 20″ height.
Step 4: Add Seam Allowances
Seam allowances are crucial for assembling your bag. They provide the space for your stitches.
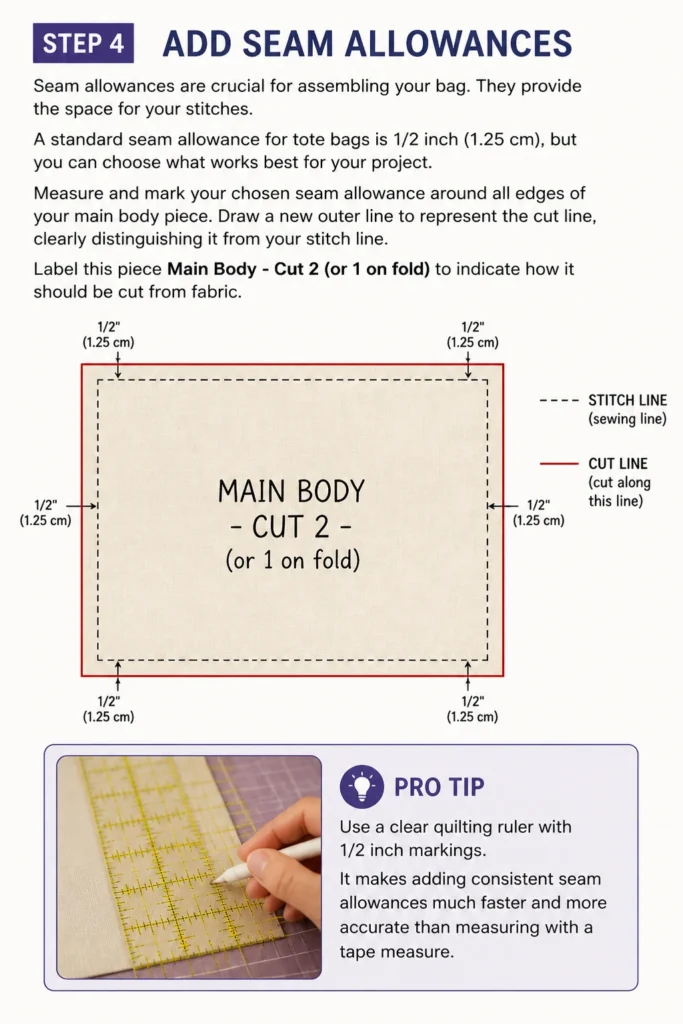
A standard seam allowance for tote bags is 1/2 inch (1.25 cm), but you can choose what works best for your project.
- Measure and mark your chosen seam allowance around all edges of your main body piece.
- Draw a new outer line to represent the cut line, clearly distinguishing it from your stitch line.
- Label this piece “Main Body – Cut 2 (or 1 on fold)” to indicate how it should be cut from fabric.
Pro Tip: Use a clear quilting ruler with 1/2 inch markings. It makes adding consistent seam allowances much faster and more accurate than measuring with a tape measure.
Step 5: Create Boxed Corners (Optional but Recommended)
Boxed corners give your tote bag structure and a flat bottom, allowing it to stand upright.
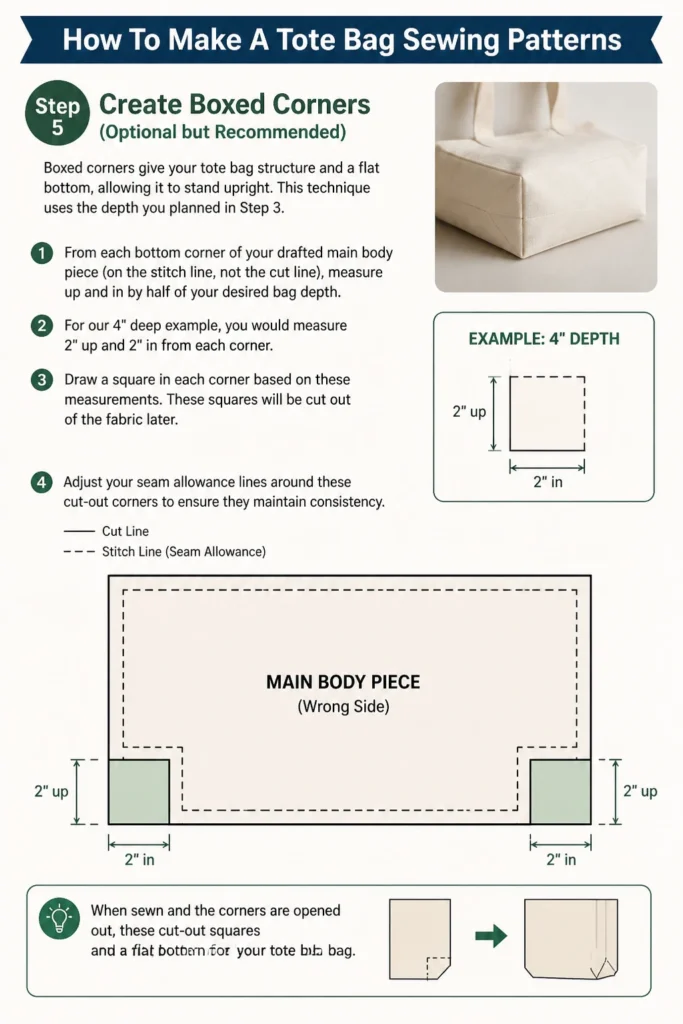
This technique uses the depth you planned in Step 3.
- From each bottom corner of your drafted main body piece (on the stitch line, not the cut line), measure up and in by half of your desired bag depth.
- For our 4″ deep example, you would measure 2″ up and 2″ in from each corner.
- Draw a square in each corner based on these measurements. These squares will be cut out of the fabric later.
- Adjust your seam allowance lines around these cut-out corners to ensure they maintain consistency.
Step 6: Draft the Lining Pattern (If Applicable)
A lining adds a professional finish and can make your bag more durable.
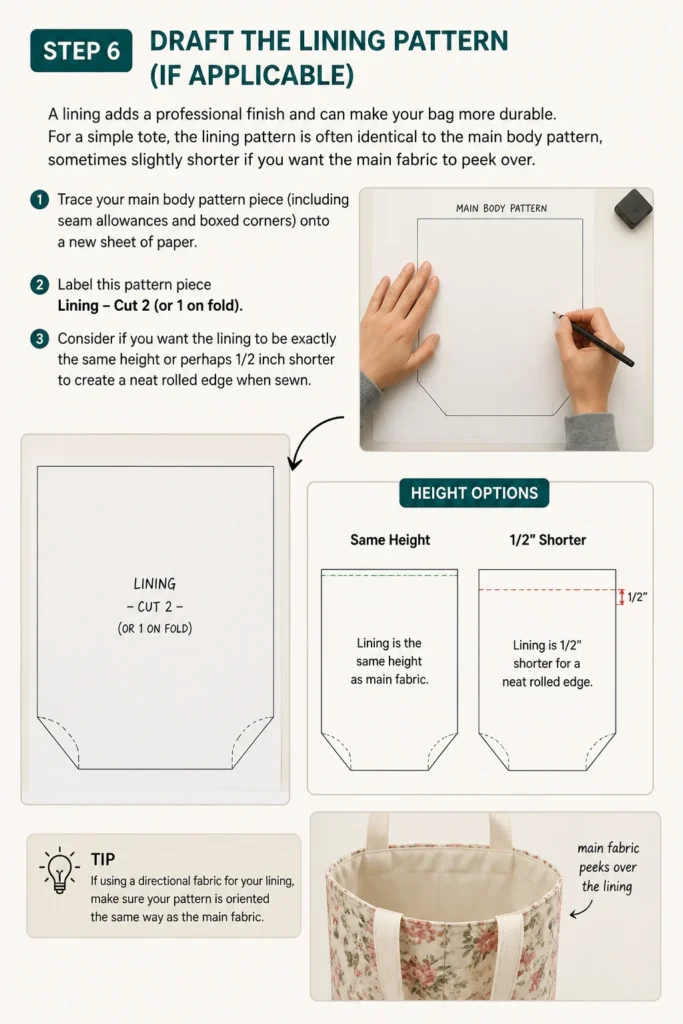
For a simple tote, the lining pattern is often identical to the main body pattern, sometimes slightly shorter if you want the main fabric to peek over.
- Trace your main body pattern piece (including seam allowances and boxed corners) onto a new sheet of paper.
- Label this pattern piece “Lining – Cut 2 (or 1 on fold)”.
- Consider if you want the lining to be exactly the same height or perhaps 1/2 inch shorter to create a neat rolled edge when sewn.
Step 7: Design and Draft the Straps
Straps are vital for comfort and functionality. Think about how long and wide you want them to be.
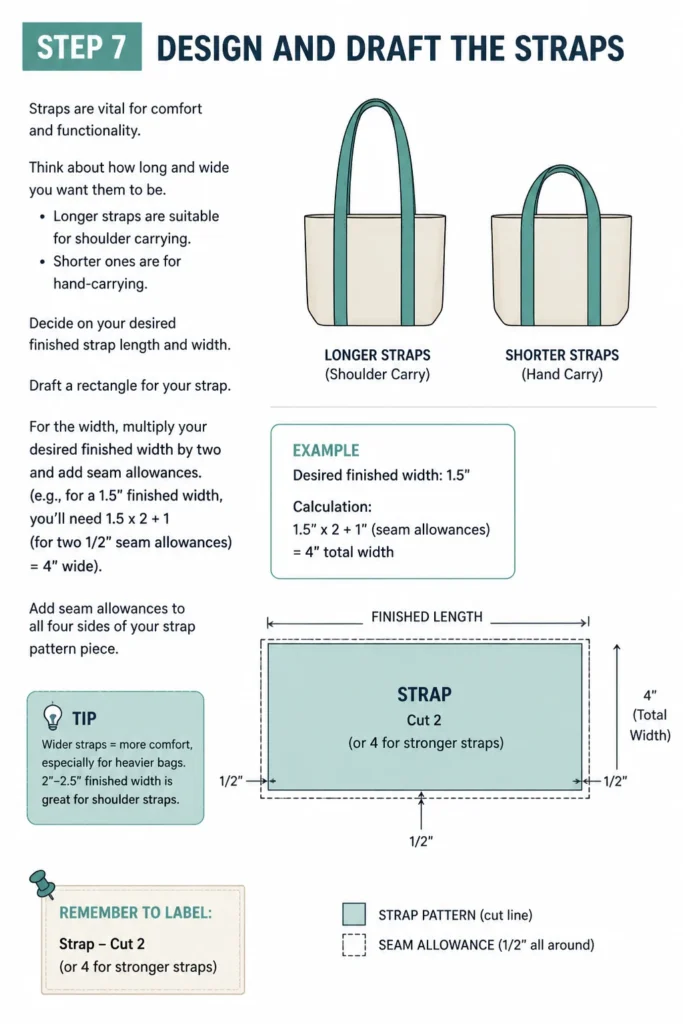
Longer straps are suitable for shoulder carrying, while shorter ones are for hand-carrying.
- Decide on your desired finished strap length and width.
- Draft a rectangle for your strap. For the width, multiply your desired finished width by two and add seam allowances (e.g., for a 1.5″ finished width, you’ll need 1.5″ x 2 + 1″ (for two 1/2″ seam allowances) = 4″ wide).
- Add seam allowances to all four sides of your strap pattern piece.
- Label this piece “Strap – Cut 2 (or 4 for stronger straps)”.
Step 8: Create Pocket Patterns (Optional)
Pockets are incredibly useful for organizing small items within your tote.
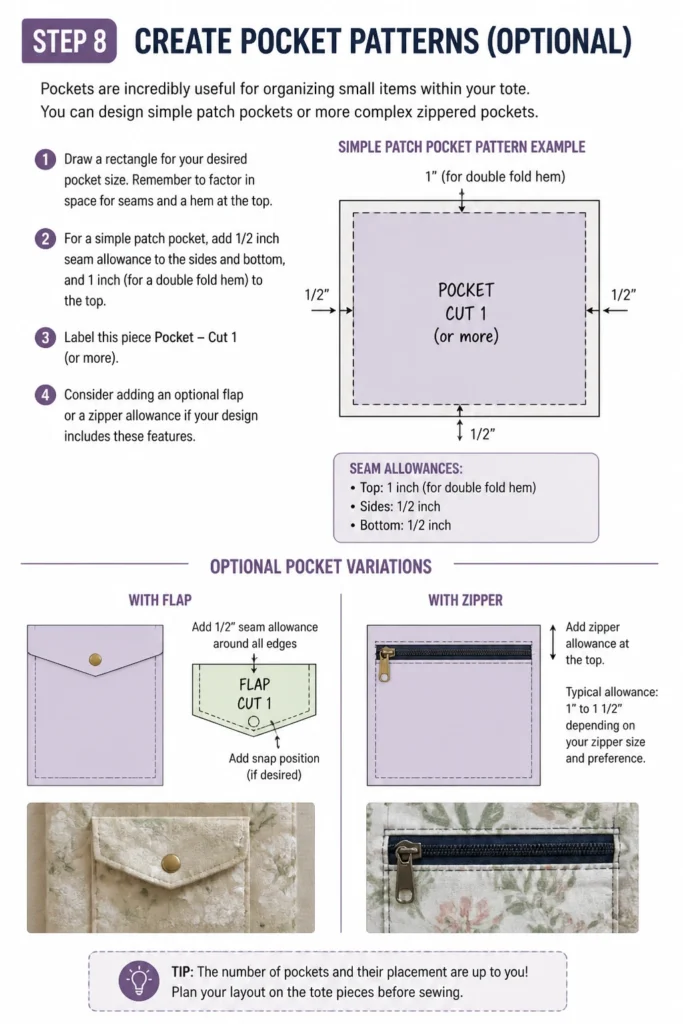
You can design simple patch pockets or more complex zippered pockets.
- Draw a rectangle for your desired pocket size. Remember to factor in space for seams and a hem at the top.
- For a simple patch pocket, add 1/2 inch seam allowance to the sides and bottom, and 1 inch (for a double fold hem) to the top.
- Label this piece “Pocket – Cut 1 (or more)”.
- Consider adding an optional flap or a zipper allowance if your design includes these features.
Step 9: Review, Label, and Cut Your Patterns
Before cutting into fabric, a final review of your paper patterns is crucial for accuracy.
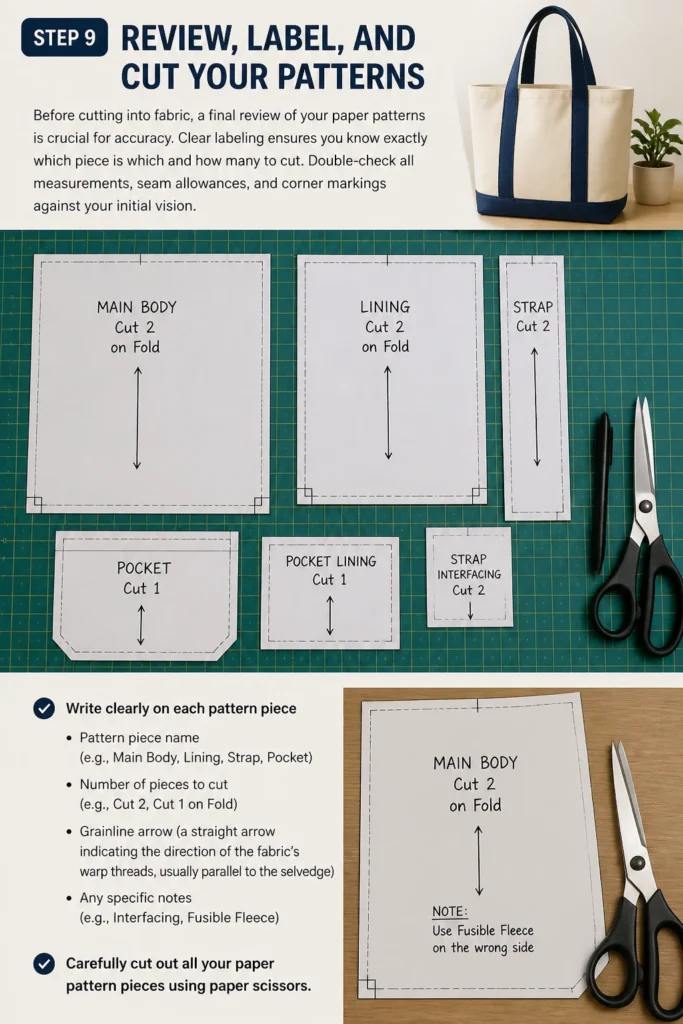
Clear labeling ensures you know exactly which piece is which and how many to cut.
- Double-check all measurements, seam allowances, and corner markings against your initial vision.
- Write clearly on each pattern piece:
- Pattern piece name (e.g., “Main Body,” “Lining,” “Strap,” “Pocket”)
- Number of pieces to cut (e.g., “Cut 2,” “Cut 1 on Fold”)
- Grainline arrow (a straight arrow indicating the direction of the fabric’s warp threads, usually parallel to the selvedge)
- Any specific notes (e.g., “Interfacing,” “Fusible Fleece”)
- Carefully cut out all your paper pattern pieces using paper scissors.
Common Mistakes to Avoid
Forgetting Seam Allowances
One of the most frequent errors is drafting a pattern to the exact finished dimensions without accounting for seam allowances. If you cut your fabric exactly to your desired finished size, your bag will end up smaller than intended once you sew the seams. Always remember to add consistent seam allowances around all edges of your pattern pieces.
Inaccurate Measurements
Even a slight inaccuracy in your initial drafting can lead to pieces that don’t fit together correctly. Use a reliable, long ruler and a measuring tape. Double-check your measurements before drawing your final lines. Working on a large, flat surface helps ensure your lines are straight and angles are true.
Neglecting Grainline
The grainline marking on a pattern piece tells you how to align the pattern with the fabric’s weave. Ignoring this can result in a bag that sags, stretches, or hangs oddly. Always mark the grainline parallel to the selvedge of your fabric to ensure the bag maintains its shape and drape as intended.
Unclear Labeling
When you have multiple pieces, especially for a lined bag with pockets, it’s easy to get confused. Failing to clearly label each pattern piece with its name, cutting instructions, and grainline can lead to cutting the wrong number of pieces or cutting them incorrectly. Take the extra minute to label everything thoroughly.
Troubleshooting
Pattern Pieces Don’t Align
If your main body and lining pieces, or pocket pieces, don’t align perfectly when you’re ready to cut fabric, it usually points to an inconsistency in your initial measurements or seam allowance application. Go back to your paper patterns and re-measure all edges and seam allowances. Ensure you added the same seam allowance to corresponding edges.
Bag Appears Too Small/Large
This often happens if you miscalculated the initial dimensions or forgot to account for seam allowances. If your bag is too small, it’s likely you didn’t add seam allowances, or your initial desired dimensions were off. If it’s too large, you might have added too much seam allowance or simply drafted the base size too big. Revisit Step 3 and Step 4 to verify your calculations.
Straps Feel Uncomfortable or Look Wrong
Strap issues can stem from incorrect length, width, or placement. If they feel too short or too long, adjust the pattern length in Step 7. If they feel too thin or too wide, modify the width. Sometimes, the issue is where they are attached to the bag; mark attachment points on your pattern to ensure consistent placement.
Key Takeaways
- Start with a clear vision and sketch of your desired tote bag, including its purpose and features.
- Accurate measurements and consistent seam allowances are fundamental to successful pattern drafting.
- Always add seam allowances to all edges of your pattern pieces before cutting fabric.
- Boxed corners are a simple yet effective way to add structure and a flat bottom to your tote.
- Label all pattern pieces clearly with their name, cutting instructions, and grainline for easy use.
- Don’t be afraid to experiment and refine your pattern; the beauty of making your own is customization.
Frequently Asked Questions
Can I make a pattern for a drawstring tote?
Yes, you absolutely can! For a drawstring tote, you would draft the main body similarly, but ensure you add extra height at the top for the drawstring casing. You’ll need to measure and mark where the casing folds and where the drawstring exits, adding appropriate seam allowances for these details.
How do I make a pattern for a zippered pocket?
For a zippered pocket, you’d draft a rectangle for the pocket bag, similar to a patch pocket, but you’ll also need to create a separate pattern piece or marking for the zipper opening on the main bag or lining piece. This involves drafting a small rectangle or slit where the zipper will be inserted, ensuring it’s the correct length for your zipper.
What if I want a rounded bottom on my tote?
To create a rounded bottom, you would start with your main body rectangle. Instead of creating boxed corners, you would use a large compass or a round object (like a plate or bowl) to gently curve the bottom corners of your pattern piece. Remember to maintain your seam allowance around this new curved edge.
Should I add interfacing to my pattern?
Interfacing isn’t a pattern piece itself, but rather a material you cut using your existing pattern pieces. You would decide which pieces need interfacing (e.g., main body, straps, pocket) and then simply cut those same pattern pieces from your chosen interfacing material. Mark on your pattern if a piece requires interfacing for future reference.
Our Top Recommended Finds
- Large Craft Paper Roll: Perfect for drafting multiple patterns without running out of space, offering a smooth surface for drawing.
- Quilting Ruler Set (18″ x 2″ and a square ruler): Essential for precise, straight lines and accurate seam allowance markings, making your patterns professional.
- Fabric Shears and Paper Scissors: Keep your fabric shears sharp by only using them on fabric. A separate pair of scissors for paper ensures your fabric shears last longer.
Your Creative Journey Awaits
Now that you have the knowledge and steps to create your very own tote bag sewing patterns, there’s no limit to what you can design.
Imagine the satisfaction of carrying a bag that truly reflects your style and meets your exact needs.
Don’t just dream about it; grab your paper and pencil today, and start drafting your next favorite accessory.