How To Shorten A Dress Without Sewing
I once found the perfect vintage maxi dress for a wedding only to realize it trailed three inches behind me on the floor.
With only an hour before I had to leave and no sewing machine in sight, I had to find a way to make it work.
This guide comes from years of trial and error in fashion emergencies where a needle and thread simply were not an option.
Quick Overview
Shortening a dress without sewing is a fast and effective way to customize your wardrobe. You can achieve a professional-looking hem using heat-activated adhesives or temporary styling tricks.
- Time needed: 20 to 40 minutes
- Difficulty: Beginner
- What you’ll need: Iron, iron-on hem tape, fabric chalk, scissors, measuring tape, and a pressing cloth.
Step-by-Step Instructions
Step 1: Determine Your Ideal Length
Put on the dress along with the exact shoes you plan to wear with it. Shoe height significantly changes where the hem should sit on your leg or the floor.
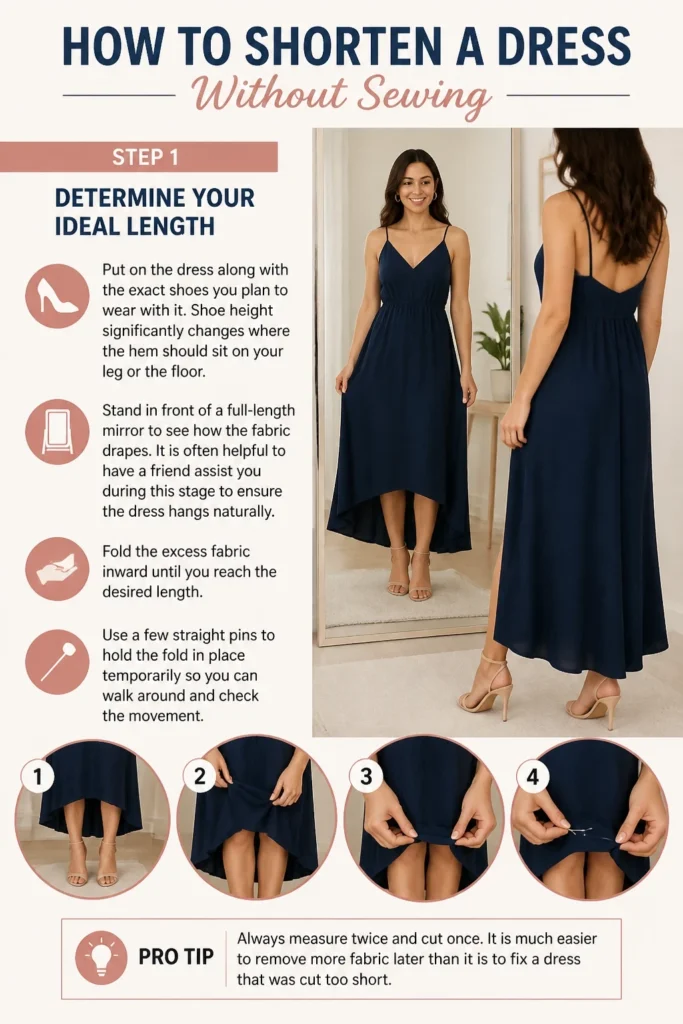
Stand in front of a full-length mirror to see how the fabric drapes. It is often helpful to have a friend assist you during this stage to ensure the dress hangs naturally.
Fold the excess fabric inward until you reach the desired length. Use a few straight pins to hold the fold in place temporarily so you can walk around and check the movement.
Pro Tip: Always measure twice and cut once. It is much easier to remove more fabric later than it is to fix a dress that was cut too short.
Step 2: Create a Clear Guide Line
Remove the dress carefully so the pins do not fall out. Lay the garment flat on a hard, clean surface like a table or an ironing board.
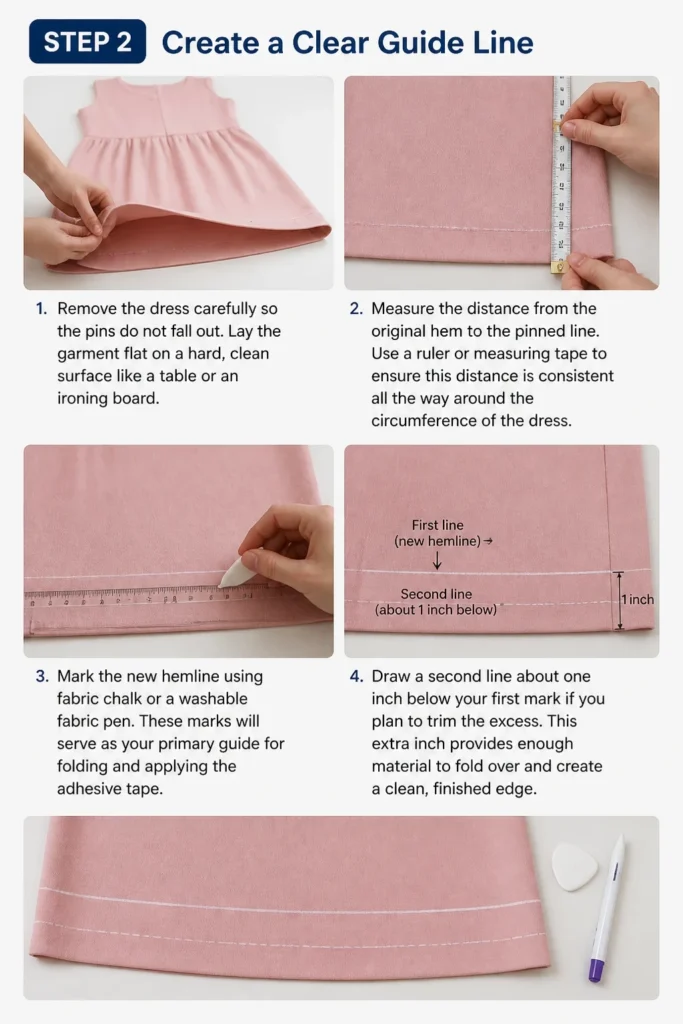
Measure the distance from the original hem to the pinned line. Use a ruler or measuring tape to ensure this distance is consistent all the way around the circumference of the dress.
Mark the new hemline using fabric chalk or a washable fabric pen. These marks will serve as your primary guide for folding and applying the adhesive tape.
Draw a second line about one inch below your first mark if you plan to trim the excess. This extra inch provides enough material to fold over and create a clean, finished edge.
Step 3: Prepare the Fabric Surface
Turn the dress inside out before you begin any heat application. This protects the outer finish of the fabric from potential iron marks or adhesive seepage.
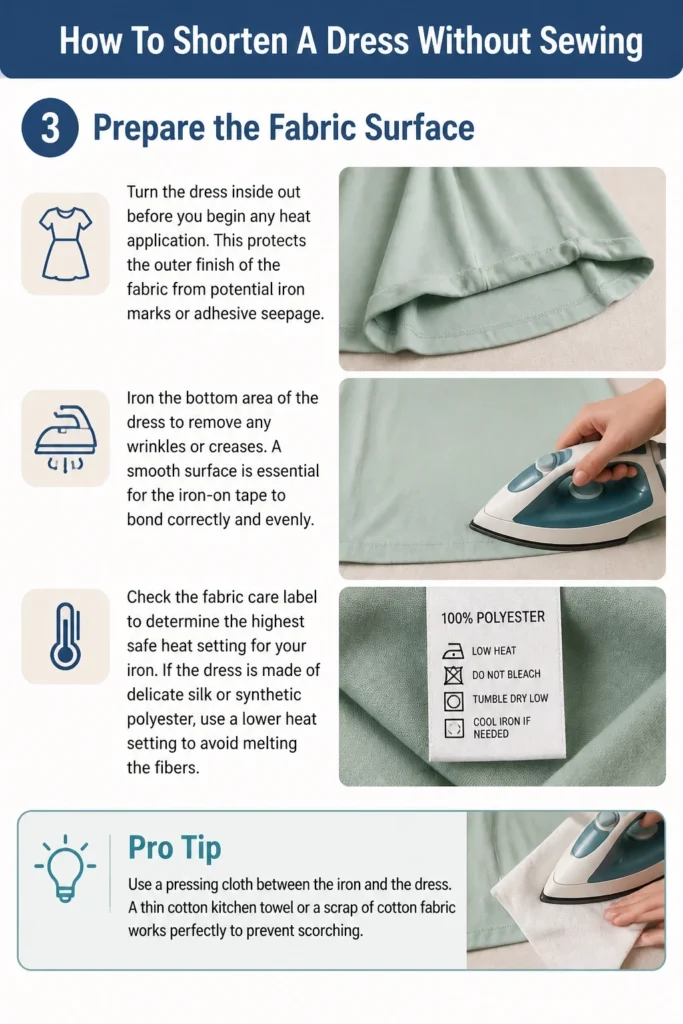
Iron the bottom area of the dress to remove any wrinkles or creases. A smooth surface is essential for the iron-on tape to bond correctly and evenly.
Check the fabric care label to determine the highest safe heat setting for your iron. If the dress is made of delicate silk or synthetic polyester, use a lower heat setting to avoid melting the fibers.
Pro Tip: Use a pressing cloth between the iron and the dress. A thin cotton kitchen towel or a scrap of cotton fabric works perfectly to prevent scorching.
Step 4: Measure the Adhesive Tape
Unroll your iron-on hem tape and lay it along the chalk line you created. Do not stretch the tape as you measure, as this can cause the fabric to pucker later.
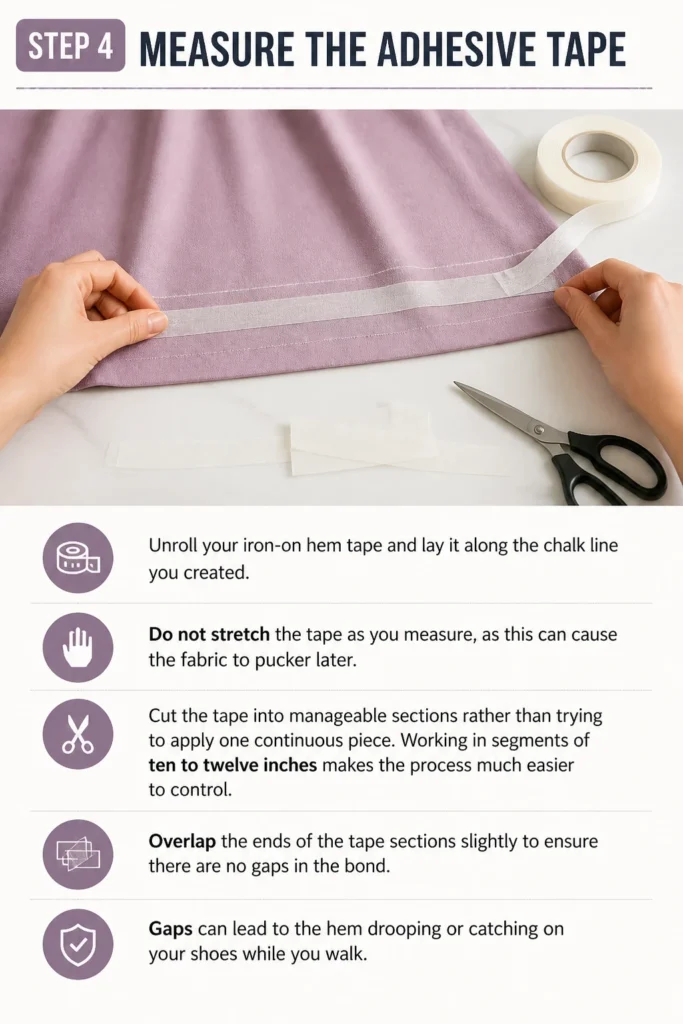
Cut the tape into manageable sections rather than trying to apply one continuous piece. Working in segments of ten to twelve inches makes the process much easier to control.
Overlap the ends of the tape sections slightly to ensure there are no gaps in the bond. Gaps can lead to the hem drooping or catching on your shoes while you walk.
Step 5: Position the Hem Fold
Fold the fabric upward along your chalk line so the raw edge is tucked inside the dress. The hem tape should be sandwiched between the two layers of fabric.
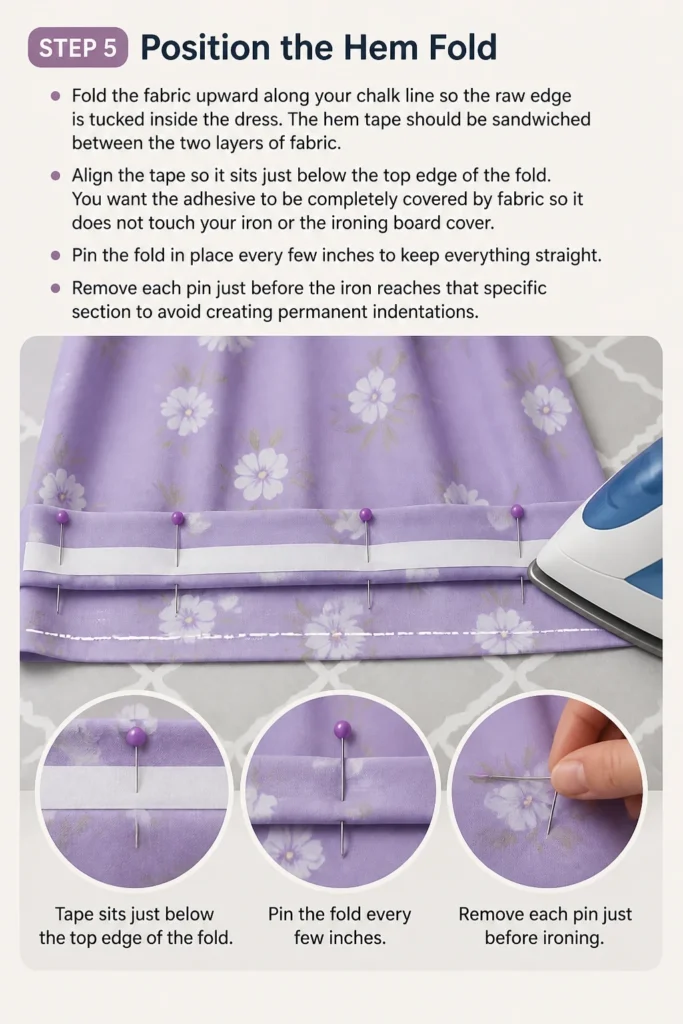
Align the tape so it sits just below the top edge of the fold. You want the adhesive to be completely covered by fabric so it does not touch your iron or the ironing board cover.
Pin the fold in place every few inches to keep everything straight. Remove each pin just before the iron reaches that specific section to avoid creating permanent indentations.
Step 6: Activate the Adhesive Bond
Set your iron to the temperature recommended on the hem tape packaging. Most tapes require a medium to high heat setting without steam to activate the glue.
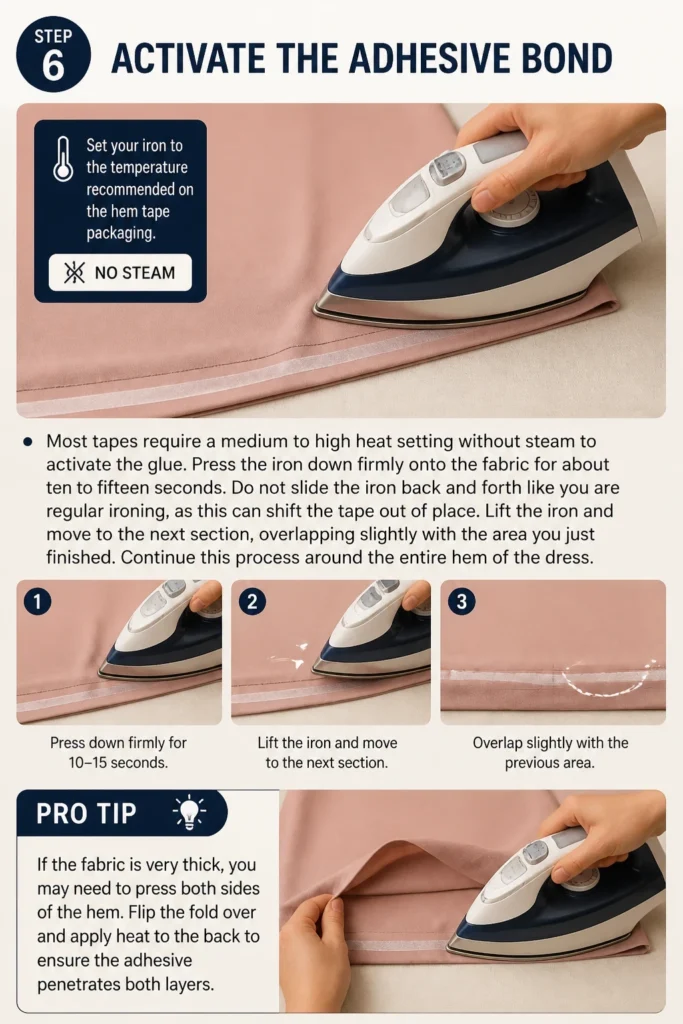
Press the iron down firmly onto the fabric for about ten to fifteen seconds. Do not slide the iron back and forth like you are regular ironing, as this can shift the tape out of place.
Lift the iron and move to the next section, overlapping slightly with the area you just finished. Continue this process around the entire hem of the dress.
Pro Tip: If the fabric is very thick, you may need to press both sides of the hem. Flip the fold over and apply heat to the back to ensure the adhesive penetrates both layers.
Step 7: Allow for Proper Setting Time
Leave the dress flat on the ironing board for at least five to ten minutes. The adhesive is still liquid while hot and needs time to solidify into a permanent bond.
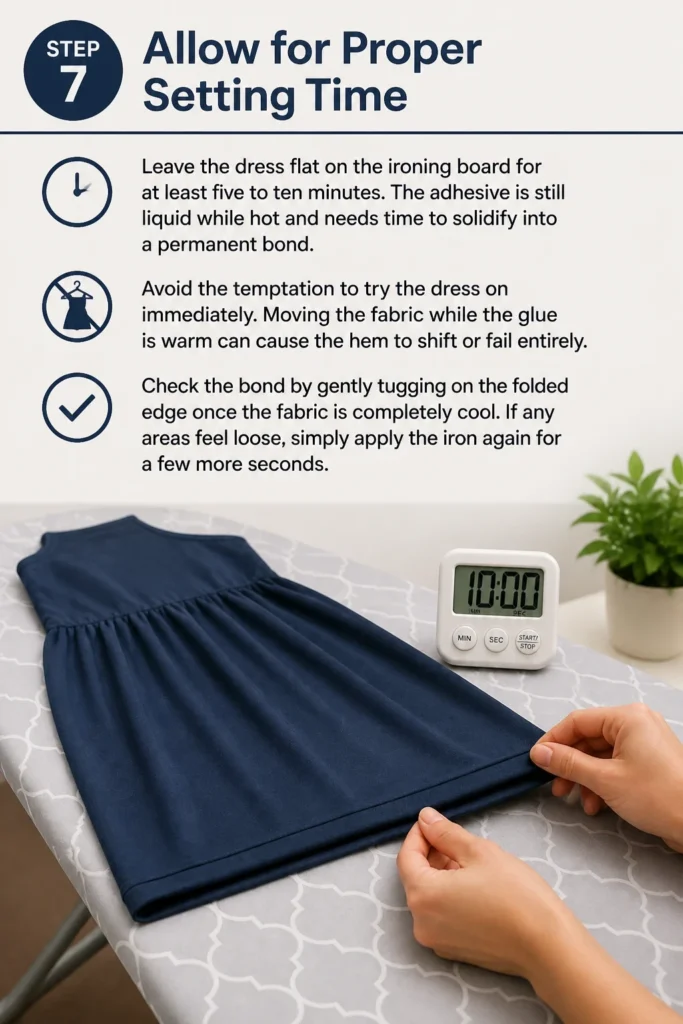
Avoid the temptation to try the dress on immediately. Moving the fabric while the glue is warm can cause the hem to shift or fail entirely.
Check the bond by gently tugging on the folded edge once the fabric is completely cool. If any areas feel loose, simply apply the iron again for a few more seconds.
Step 8: Perform a Movement Test
Turn the dress right-side out and put it on once more. Walk around the room, sit down, and climb a few stairs to test the durability of the new hem.
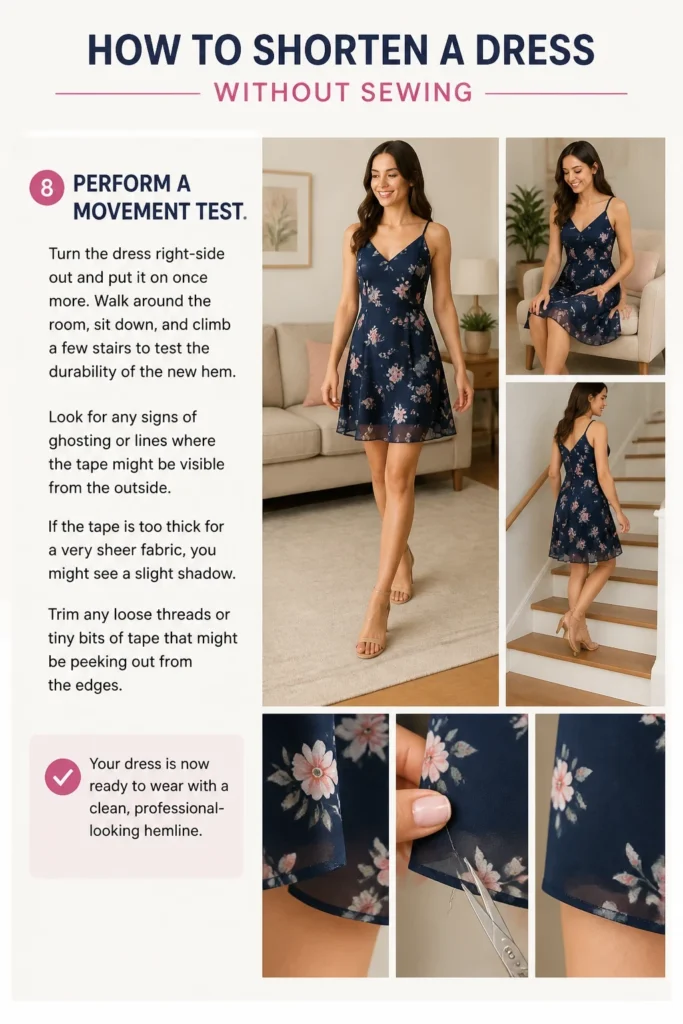
Look for any signs of “ghosting” or lines where the tape might be visible from the outside. If the tape is too thick for a very sheer fabric, you might see a slight shadow.
Trim any loose threads or tiny bits of tape that might be peeking out from the edges. Your dress is now ready to wear with a clean, professional-looking hemline.
Common Mistakes to Avoid
Using Steam on Heat-Activated Tape
Many people assume that steam helps the bonding process, but it can actually ruin the adhesive. Moisture prevents the glue from sticking properly to the fabric fibers. Ensure your iron is on a dry setting before you begin pressing the hem tape into place.
Ignoring the Fabric Weight
Using a heavy-duty hem tape on a lightweight chiffon dress will result in a stiff, unnatural hem. Conversely, using a light tape on heavy denim will not provide enough hold. Always match the weight of your adhesive tape to the weight of the dress material for the best results.
Skipping the Pre-Wash
If the dress is brand new, it might have factory finishes or chemicals that prevent the tape from sticking. Washing and drying the garment before shortening it ensures a clean surface for the bond. It also prevents the dress from shrinking later, which could make your new hem too short.
Cutting Before Testing
Cutting the fabric is the only truly permanent part of this process. Some people cut the excess fabric before they have even tested the fold with pins. Always verify the length while wearing your shoes before you ever pick up the scissors.
Troubleshooting
The Hem Tape is Not Sticking
This usually happens because the iron was not hot enough or was not held in place long enough. Try increasing the heat slightly and pressing for a full fifteen seconds. If the fabric has a waterproof coating, the adhesive may struggle to penetrate the surface.
The Hem Looks Wavy or Puckered
Puckering occurs when the fabric is stretched while the tape is being applied. To fix this, you can often reheat the area to soften the glue and gently reposition the fabric. Make sure the dress is lying completely flat and tension-free during the next attempt.
Adhesive Leaked Onto the Iron
If the tape was not fully covered by the fabric fold, it might melt onto your iron plate. Stop immediately and let the iron cool down completely. You can usually scrape off the dried glue with a plastic scraper or use a specialized iron cleaner to restore the surface.
Key Takeaways
- Always wear your intended shoes when measuring the new length to ensure accuracy.
- Use a pressing cloth to protect delicate fabrics from direct heat and potential damage.
- Work in small sections to maintain control and prevent the tape from shifting.
- Allow the adhesive to cool completely before moving or wearing the garment.
- Match the tape strength to the weight of your fabric for a natural-looking drape.
- Iron-on tape is a durable solution but can often be removed with heat if you need to adjust it later.
Frequently Asked Questions
Is iron-on hem tape permanent?
Most iron-on hem tapes are designed to be permanent and can withstand multiple rounds of washing and dry cleaning. However, the bond can sometimes be loosened by reapplying high heat if you need to make an adjustment. It is a long-term solution but offers more flexibility than a permanent stitch.
Can I shorten a pleated dress without sewing?
Shortening a pleated dress is more complex because you must maintain the integrity of each pleat. You can use hem tape, but you must be careful to fold each pleat individually and press them sharply. It requires more time and precision to ensure the pleats still hang correctly at the new shorter length.
Will fabric glue work as well as hem tape?
Fabric glue is an excellent alternative for areas that are difficult to reach with an iron or for fabrics that cannot handle heat. It provides a strong bond but takes much longer to dry, usually requiring twenty-four hours to set completely. It can also be messier to apply and may soak through very thin fabrics.
What if my dress is made of leather or vinyl?
Heat-activated tape should never be used on leather, vinyl, or faux leather as the iron will melt the material. For these fabrics, a specialized double-sided garment tape or a specific leather adhesive is the better choice. These options do not require heat and will keep the material safe from damage.
Our Top Recommended Finds
- Heavy-Duty Iron-On Hem Tape: This is perfect for denim, wool, or thick cotton dresses that need a strong hold. It provides a wide bonding surface that stays secure through many washes.
- Fine Fabric Fusible Web: This ultra-thin adhesive is designed for silks, rayons, and sheers. It creates a bond that is virtually invisible and does not add stiffness to the hem.
- Washable Fabric Chalk Set: A good set of chalk pens allows you to mark your lines clearly without leaving permanent stains. Look for a set with multiple colors so the marks are visible on both light and dark fabrics.
Rock Your New Look Tonight
You now have the skills to transform any dress in your closet without ever touching a needle. This method is a game-changer for last-minute events and for those who want a tailored look without the high cost of professional alterations.
Once you master the art of the no-sew hem, you can start experimenting with other garment hacks. You might try tapering the sides of a boxy shirt with fabric glue or adding decorative trim to a skirt using the same iron-on techniques.
Take a look through your wardrobe today and find that one piece you have been avoiding because it is just a little too long. Grab your iron and some tape, and give that dress the second life it deserves.