How To Make A Face Mask Sewing
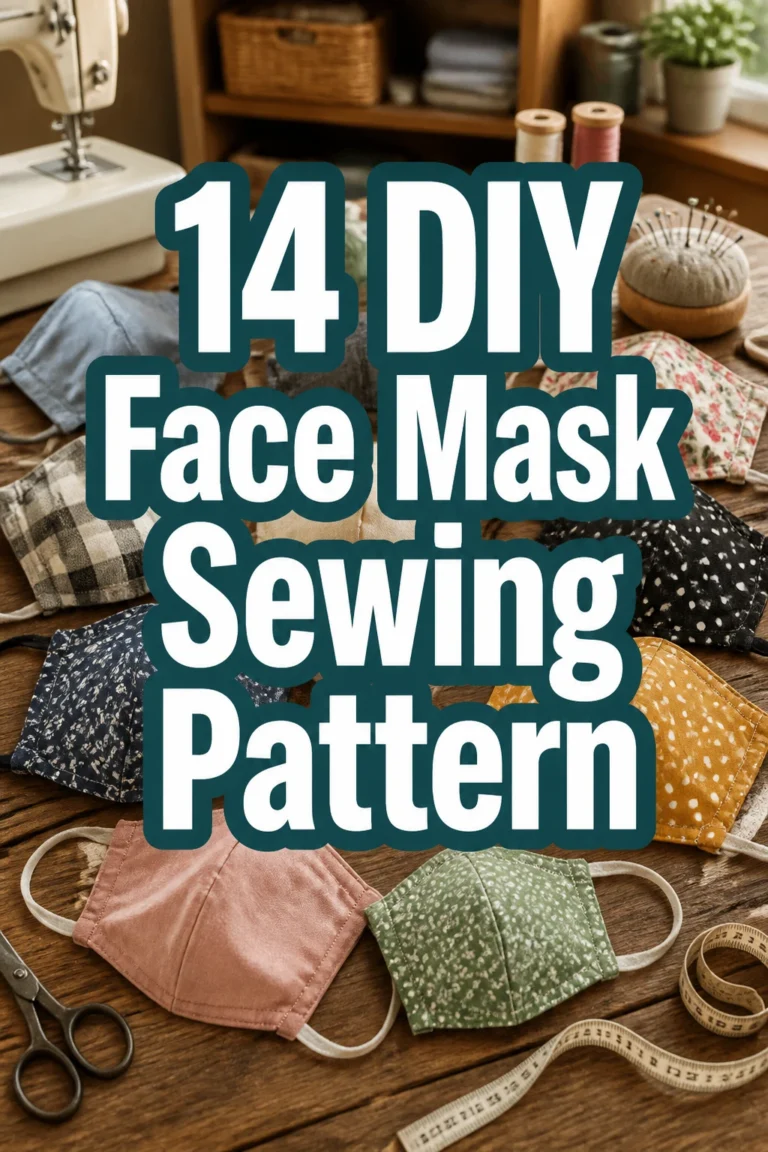
Creating your own face mask can feel incredibly rewarding. It’s a practical skill that helps keep you and your community safer.
I’ve made dozens of these masks for my family and friends, perfecting the process through trial and error. This guide shares all the best practices I’ve learned, ensuring your sewing project is straightforward and successful.
You’ll gain the confidence to craft comfortable and effective masks right from your home.
Quick Overview
This guide will walk you through making a fabric face mask, focusing on a comfortable, reusable design. You’ll learn how to select materials, cut your fabric, and assemble the mask with a sewing machine.
- Time needed: 1-2 hours for your first mask, 30-45 minutes for subsequent masks
- Difficulty: Beginner to Intermediate
- What you’ll need: Cotton fabric, elastic or fabric ties, sewing machine, thread, scissors, pins, iron
Step-by-Step Instructions
Step 1: Gather Your Materials and Prepare Your Workspace
Collect all necessary supplies before you begin. Having everything at hand prevents interruptions and makes the process smoother.
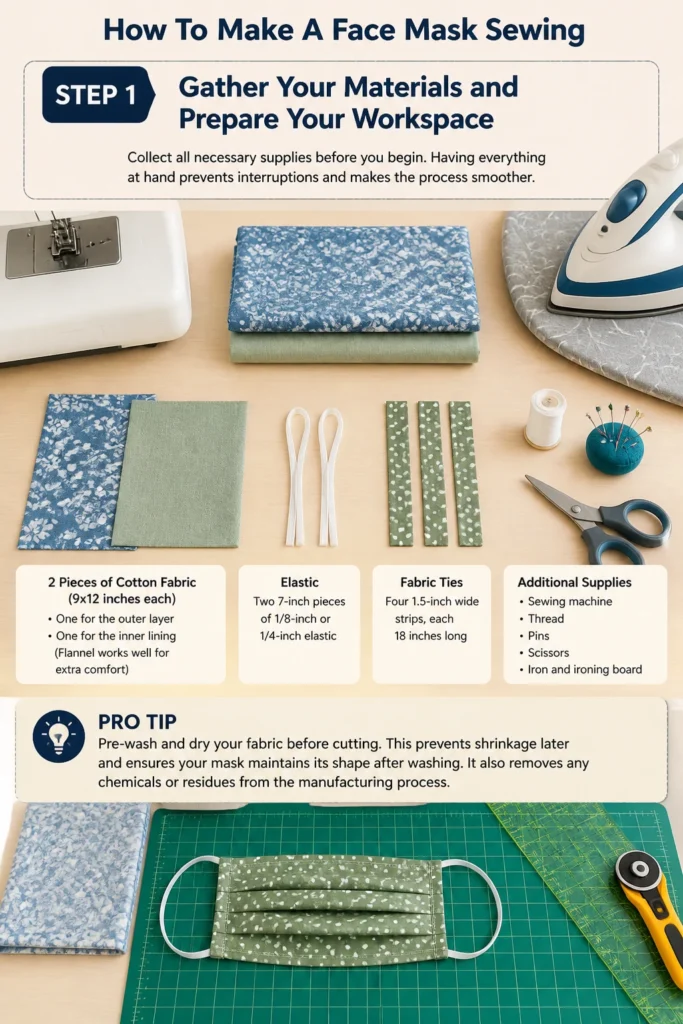
Choose two pieces of tightly woven cotton fabric, approximately 9×12 inches each. One will be the outer layer, the other the inner lining. Flannel can also work well for the lining for added comfort.
Select your elastic or fabric ties. For elastic, you’ll need two 7-inch pieces of 1/8-inch or 1/4-inch elastic. For fabric ties, prepare four strips, each 1.5 inches wide and 18 inches long.
Ensure your sewing machine is threaded and in good working order. Set up your ironing board nearby for pressing seams.
Pro Tip: Pre-wash and dry your fabric before cutting. This prevents shrinkage later and ensures your mask maintains its shape after washing. It also removes any manufacturing chemicals.
Step 2: Cut Your Fabric Pieces
Lay your pre-washed fabric flat and smooth it out. Use a rotary cutter and mat or sharp fabric scissors for precise cuts.
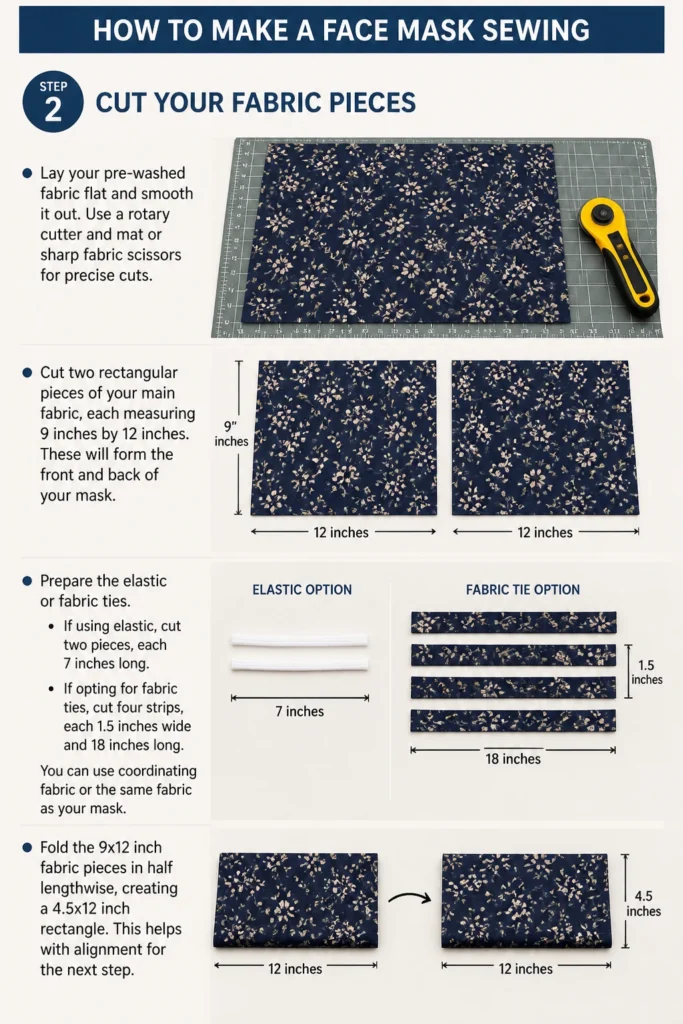
Cut two rectangular pieces of your main fabric, each measuring 9 inches by 12 inches. These will form the front and back of your mask.
Prepare the elastic or fabric ties. If using elastic, cut two pieces, each 7 inches long. If opting for fabric ties, cut four strips, each 1.5 inches wide and 18 inches long. You can use coordinating fabric or the same fabric as your mask.
Fold the 9×12 inch fabric pieces in half lengthwise, creating a 4.5×12 inch rectangle. This helps with alignment for the next step.
Step 3: Create the Main Mask Body
Place one 9×12 inch fabric rectangle right side up on your work surface. Lay the second 9×12 inch fabric rectangle directly on top, right side down.
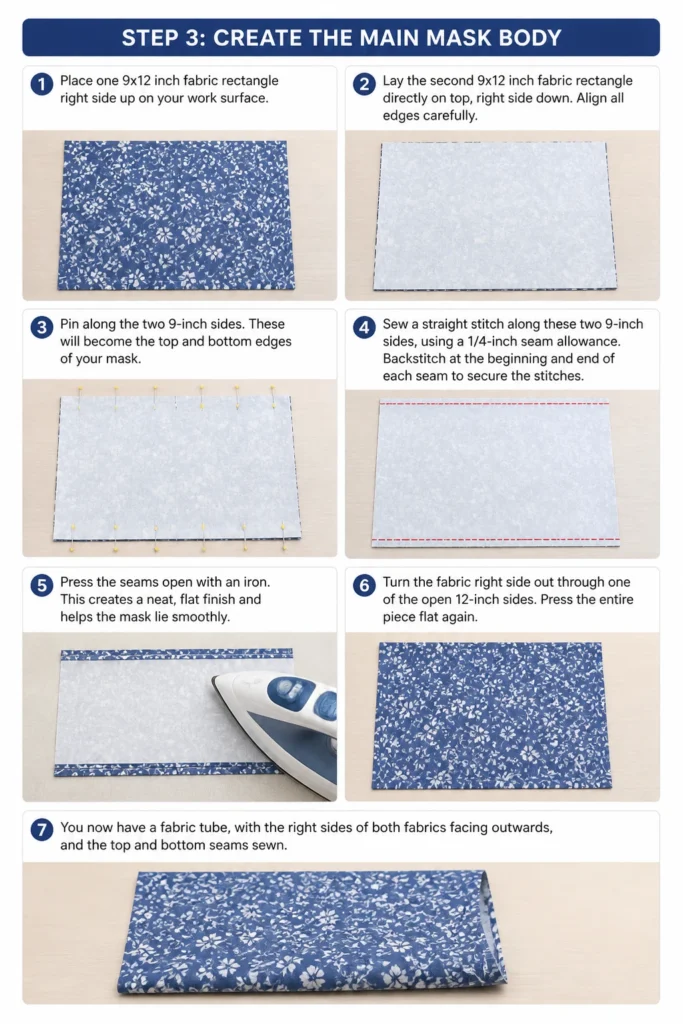
Align all edges carefully. Pin along the two 9-inch sides. These will become the top and bottom edges of your mask.
Sew a straight stitch along these two 9-inch sides, using a 1/4-inch seam allowance. Backstitch at the beginning and end of each seam to secure the stitches.
Press the seams open with an iron. This creates a neat, flat finish and helps the mask lie smoothly. Turn the fabric right side out through one of the open 12-inch sides.
Press the entire piece flat again. You now have a fabric tube, with the right sides of both fabrics facing outwards, and the top and bottom seams sewn.
Step 4: Form the Pleats
Lay your sewn fabric tube flat with the seams pressed. The open 12-inch sides are now the raw side edges of your mask.
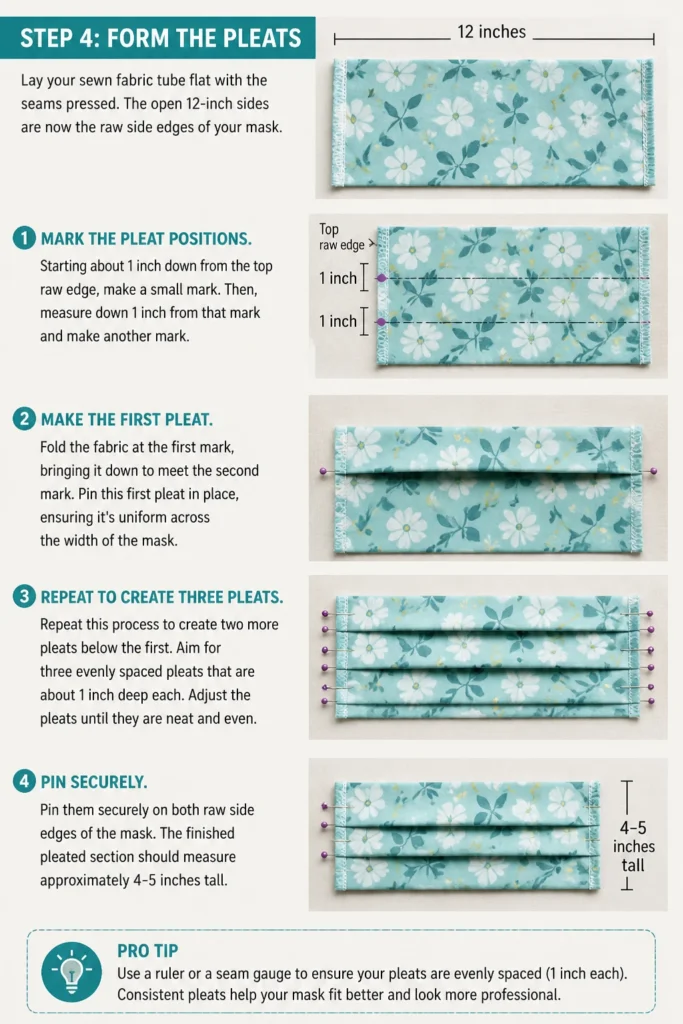
Mark the pleat positions. Starting about 1 inch down from the top raw edge, make a small mark. Then, measure down 1 inch from that mark and make another mark.
Fold the fabric at the first mark, bringing it down to meet the second mark. Pin this first pleat in place, ensuring it’s uniform across the width of the mask.
Repeat this process to create two more pleats below the first. Aim for three evenly spaced pleats that are about 1 inch deep each.
Adjust the pleats until they are neat and even. Pin them securely on both raw side edges of the mask. The finished pleated section should measure approximately 4-5 inches tall.
Pro Tip: Use a ruler or a seam gauge to ensure your pleats are consistent in depth and spacing. This attention to detail improves the mask’s appearance and fit.
Step 5: Prepare and Attach the Ear Loops or Ties
If using elastic: Take one 7-inch piece of elastic. Insert one end of the elastic into the top corner of one raw side edge, about 1/4 inch in.
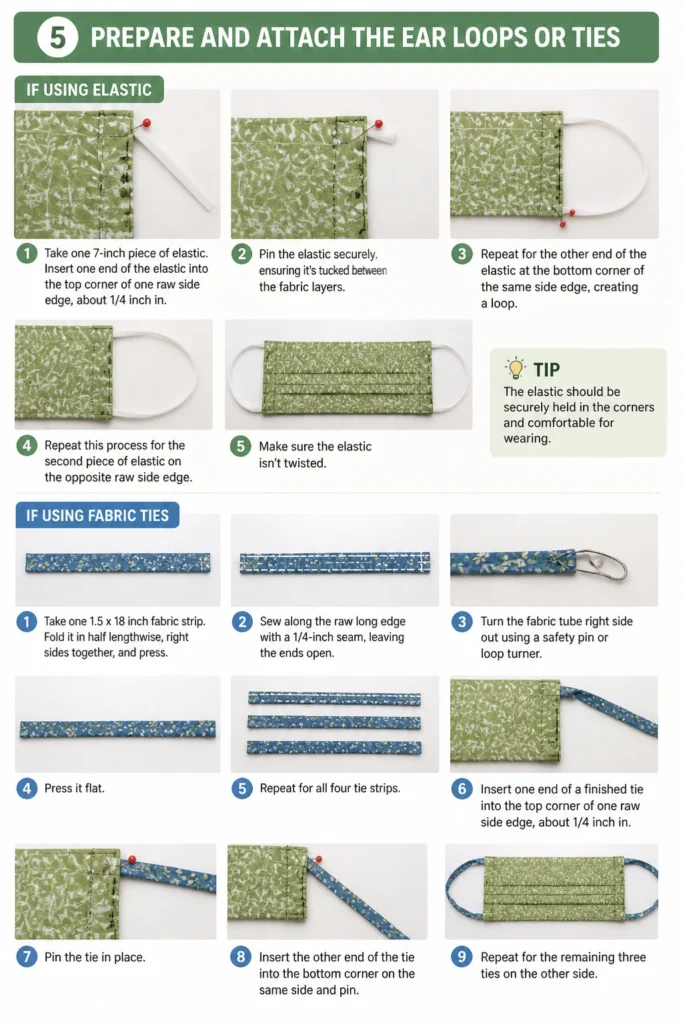
Pin the elastic securely, ensuring it’s tucked between the fabric layers. Repeat for the other end of the elastic at the bottom corner of the same side edge, creating a loop.
Repeat this process for the second piece of elastic on the opposite raw side edge. Make sure the elastic isn’t twisted.
If using fabric ties: Take one 1.5×18 inch fabric strip. Fold it in half lengthwise, right sides together, and press. Sew along the raw long edge with a 1/4-inch seam, leaving the ends open.
Turn the fabric tube right side out using a safety pin or loop turner. Press it flat. Repeat for all four tie strips.
Insert one end of a finished tie into the top corner of one raw side edge, tucking it in by about 1/4 inch. Pin in place. Repeat for the other three ties at the remaining corners.
Step 6: Finish the Side Edges
Fold the raw side edge of the mask over by 1/4 inch towards the inside. Press this fold firmly with an iron.
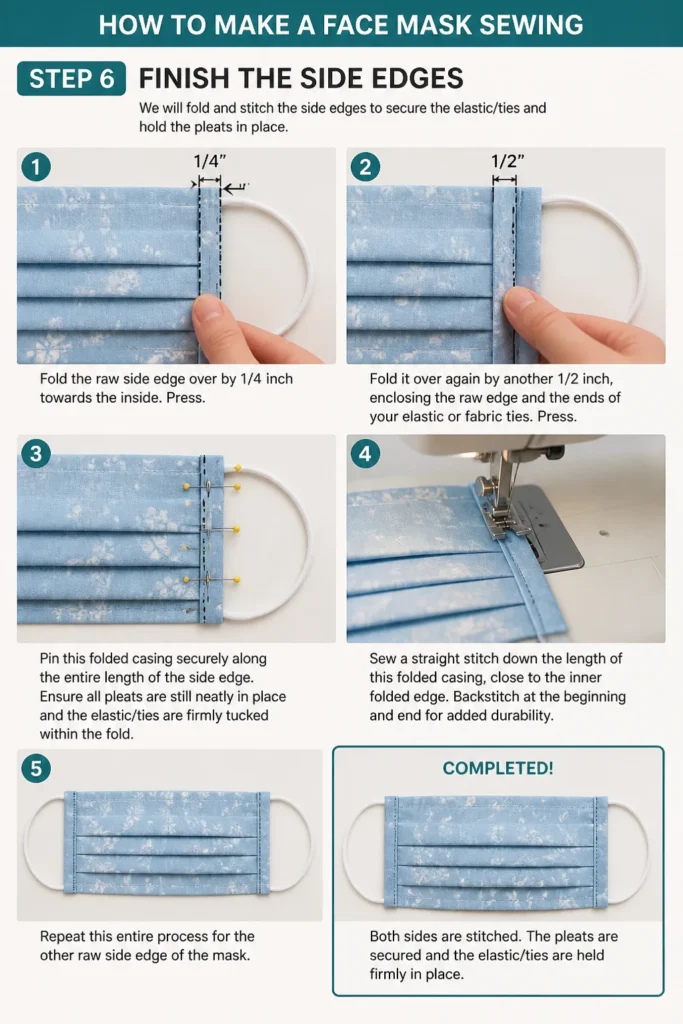
Fold it over again by another 1/2 inch, enclosing the raw edge and the ends of your elastic or fabric ties. Press once more.
Pin this folded casing securely along the entire length of the side edge. Ensure all pleats are still neatly in place and the elastic/ties are firmly tucked within the fold.
Sew a straight stitch down the length of this folded casing, close to the inner folded edge. This secures the pleats and the elastic/ties.
Backstitch at the beginning and end for added durability. Repeat this entire process for the other raw side edge of the mask.
Step 7: Final Press and Inspection
Trim any loose threads from your mask. A neat finish makes a big difference in appearance.
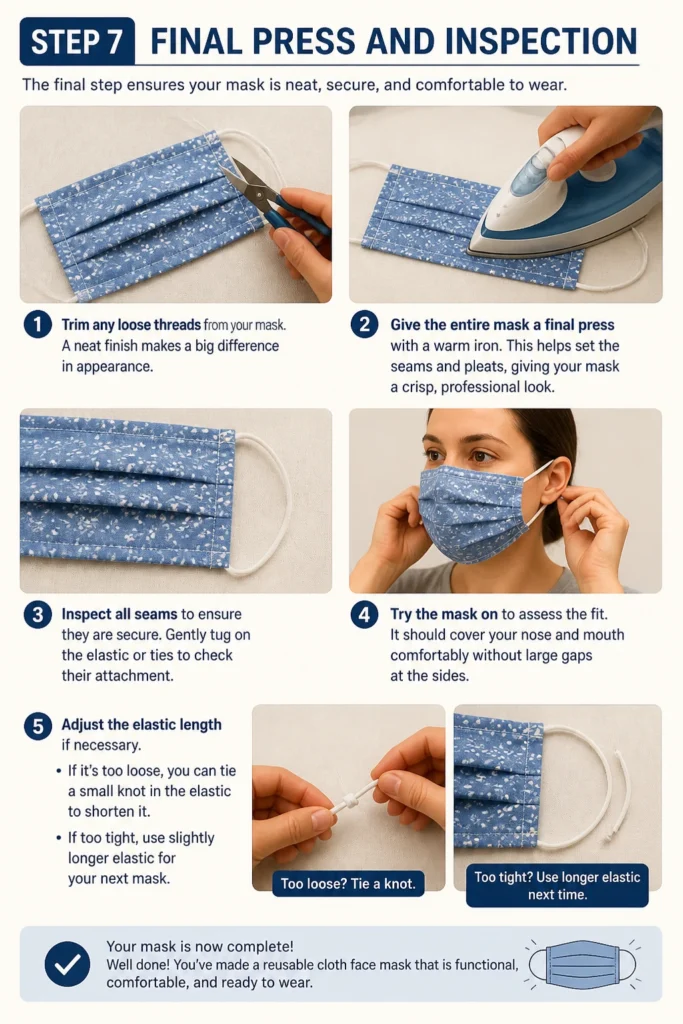
Give the entire mask a final press with a warm iron. This helps set the seams and pleats, giving your mask a crisp, professional look.
Inspect all seams to ensure they are secure. Gently tug on the elastic or ties to check their attachment.
Try the mask on to assess the fit. It should cover your nose and mouth comfortably without large gaps at the sides.
Adjust the elastic length if necessary. If it’s too loose, you can tie a small knot in the elastic to shorten it. If too tight, use slightly longer elastic for your next mask.
Common Mistakes to Avoid
Using the Wrong Fabric
Some fabrics are too porous to offer adequate protection, while others are too thick to breathe through comfortably. Avoid loosely woven fabrics like cheesecloth or knits that stretch excessively.
Always opt for tightly woven cotton, like quilting cotton or bed sheets, for both outer and inner layers. A high thread count is key for filtration without compromising breathability.
Incorrect Seam Allowance
Inconsistent seam allowances can lead to a crooked or ill-fitting mask. If your seams are too wide, the mask will be smaller than intended; too narrow, and it might not hold together well.
Aim for a consistent 1/4-inch seam allowance throughout the project. Use your sewing machine’s guide or mark your lines with a fabric pen for accuracy.
Skipping Pressing Steps
Pressing seams open or flat might seem like an extra, unnecessary step, but it’s crucial for a professional finish. Skipping this can result in bulky seams and a less structured mask.
Always press your seams after sewing each section. An iron helps fabric lie flat, makes subsequent sewing steps easier, and gives your finished mask a crisp, tailored appearance.
Attaching Elastic Incorrectly
Elastic that is twisted or sewn in too loosely will be uncomfortable or ineffective. If the elastic isn’t securely anchored, it can pull out with wear.
Ensure elastic is flat and untwisted before pinning and sewing. Tuck the ends securely within the casing and backstitch over them multiple times for reinforcement.
Troubleshooting
Mask Feels Too Tight or Too Loose
If your mask feels uncomfortable around your ears or face, the elastic length or overall dimensions might be off. A mask that’s too tight will pull, while one that’s too loose won’t seal properly.
For elastic, try adjusting the length. For a tighter fit, you can tie small knots in the elastic. For a looser fit, use a slightly longer piece of elastic for future masks (e.g., 7.5-8 inches instead of 7). Consider using adjustable ear loops or fabric ties for more flexibility.
Pleats Aren’t Even or Lie Flat
Uneven pleats can make the mask look lopsided and affect its ability to expand comfortably over your face. If they don’t lie flat, they can create bulk.
Before sewing the side casings, carefully measure and pin each pleat. Use an iron to press the pleats firmly into place before sewing. If they still don’t lie flat, gently unpick the side seam, adjust the pleats, and re-sew.
Stitching is Uneven or Breaks
Inconsistent stitching can indicate a tension issue with your sewing machine or an incorrect needle size. Broken stitches mean the seam won’t hold up to wear and washing.
Check your sewing machine’s tension settings; consult your machine’s manual if unsure. Ensure you’re using a fresh, sharp needle appropriate for cotton fabric (e.g., a universal 80/12 needle). Always re-thread both the top thread and bobbin if you encounter persistent issues.
Key Takeaways
- Pre-wash and dry your fabric to prevent shrinkage and ensure a good fit after laundering.
- Use tightly woven cotton fabric for both comfort and effective filtration.
- Pressing seams after each step is crucial for a professional finish and easier assembly.
- Measure and pin your pleats carefully to ensure an even and comfortable fit.
- Securely attach elastic or ties with multiple backstitches for durability.
- Consistent seam allowance (1/4 inch) is vital for the mask’s final dimensions and appearance.
Frequently Asked Questions
What type of thread should I use?
All-purpose polyester thread is ideal for sewing face masks. It’s strong, durable, and readily available, ensuring your seams hold up well through repeated washing and wear.
Can I make a mask without a sewing machine?
Yes, you can hand-sew a face mask, though it will take considerably more time and effort. Use a strong backstitch for all seams to ensure durability, as this mimics the strength of a machine stitch.
How often should I wash my fabric mask?
It’s recommended to wash your fabric mask after each use. Treat it like an article of clothing that comes into contact with your face and the environment. Machine wash with regular detergent and tumble dry on high heat.
Can I add a filter pocket to this design?
Absolutely. To add a filter pocket, simply cut the inner fabric piece slightly wider (e.g., 10 inches instead of 9 inches wide). After sewing the top and bottom seams (Step 3), hem the two raw 12-inch edges of the inner fabric piece before turning it right side out. This creates openings for a filter when the mask is finished.
Our Top Recommended Finds
- Good Quality Cotton Fabric: Look for quilting cottons with a high thread count. They are durable, breathable, and come in many patterns.
- 1/8-inch Braided Elastic: This type of elastic is comfortable behind the ears and holds its stretch well over time.
- Fabric Scissors or Rotary Cutter: Sharp tools make precise cuts, which are essential for a well-fitting mask. A rotary cutter with a self-healing mat is excellent for speed and accuracy.
Your Next Creative Stitch
You’ve now mastered the art of sewing a face mask, a truly valuable skill in today’s world. This project builds a solid foundation for many other practical sewing endeavors.
Consider experimenting with different fabric patterns or adding personal touches like embroidery. Perhaps try a contoured mask design next for a new challenge.
Don’t let your sewing machine gather dust. Pick out some new fabric and start another project today, continuing to build your confidence and creativity.