Abaya Pattern Sewing How To Make
Embarking on a sewing project like an abaya can feel daunting at first.
I remember my own initial attempts, carefully laying out fabric, wondering if I had the measurements just right.
Through trial and error, I’ve learned the precise steps to create a beautiful, custom-fit abaya, and I’m here to share that practical knowledge with you.
Quick Overview
This guide will walk you through creating your very own abaya from a pattern.
You’ll learn everything from selecting fabric to the final finishing touches.
- Time needed: 8-12 hours (spread over a few days for beginners)
- Difficulty: Intermediate
- What you’ll need: Fabric, abaya pattern, sewing machine, thread, scissors, pins, measuring tape, iron, marking tools.
Step-by-Step Instructions
Step 1: Gather Your Essential Supplies
Before you begin, ensure you have all necessary tools and materials.
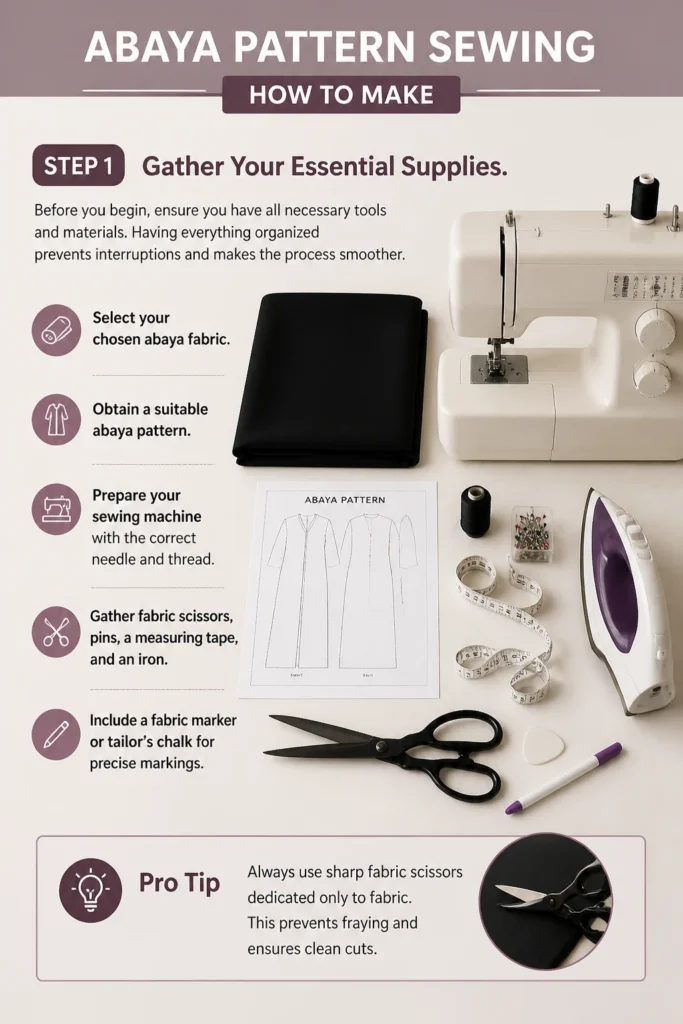
Having everything organized prevents interruptions and makes the process smoother.
- Select your chosen abaya fabric.
- Obtain a suitable abaya pattern.
- Prepare your sewing machine with the correct needle and thread.
- Gather fabric scissors, pins, a measuring tape, and an iron.
- Include a fabric marker or tailor’s chalk for precise markings.
Pro Tip: Always use sharp fabric scissors dedicated only to fabric. This prevents fraying and ensures clean cuts.
Step 2: Choose Your Fabric and Pattern Wisely
The right fabric and pattern are crucial for a successful abaya.
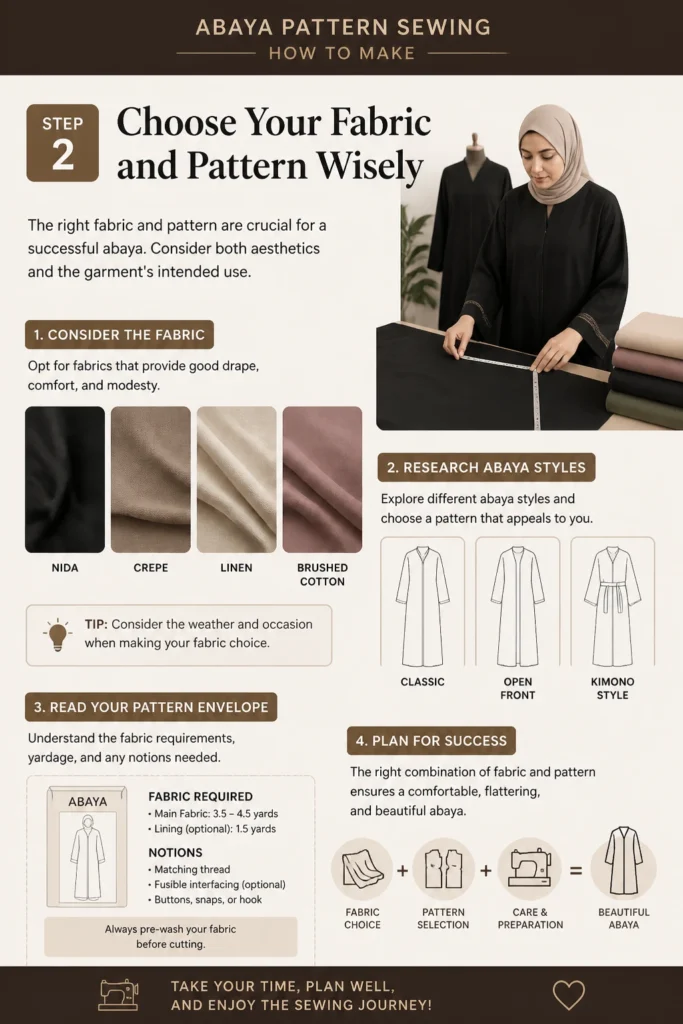
Consider both aesthetics and the garment’s intended use.
- Research different abaya styles and select a pattern that appeals to you.
- Opt for fabrics like Nida, crepe, linen, or brushed cotton for good drape and comfort.
- Read your pattern envelope carefully to understand fabric requirements and yardage.
- Consider the weather and occasion when making your fabric choice.
Step 3: Take Accurate Body Measurements
Precise measurements are key to a well-fitting abaya.
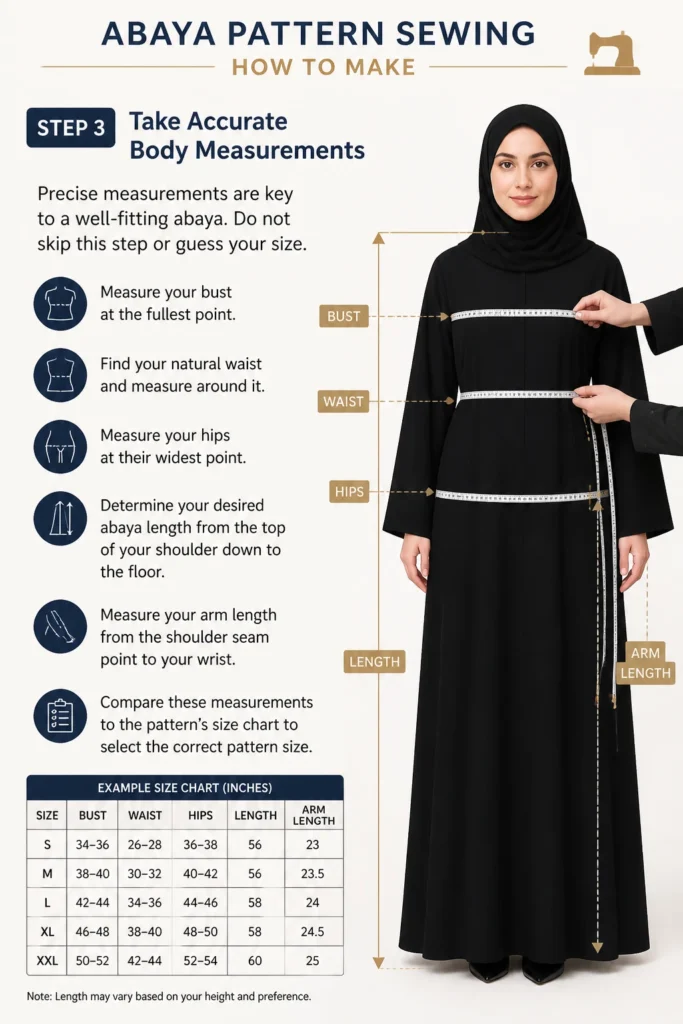
Do not skip this step or guess your size.
- Measure your bust at the fullest point.
- Find your natural waist and measure around it.
- Measure your hips at their widest point.
- Determine your desired abaya length from the top of your shoulder down to the floor.
- Measure your arm length from the shoulder seam point to your wrist.
- Compare these measurements to the pattern’s size chart to select the correct pattern size.
Step 4: Prepare Your Fabric for Cutting
Proper fabric preparation prevents shrinking and ensures accurate cutting.
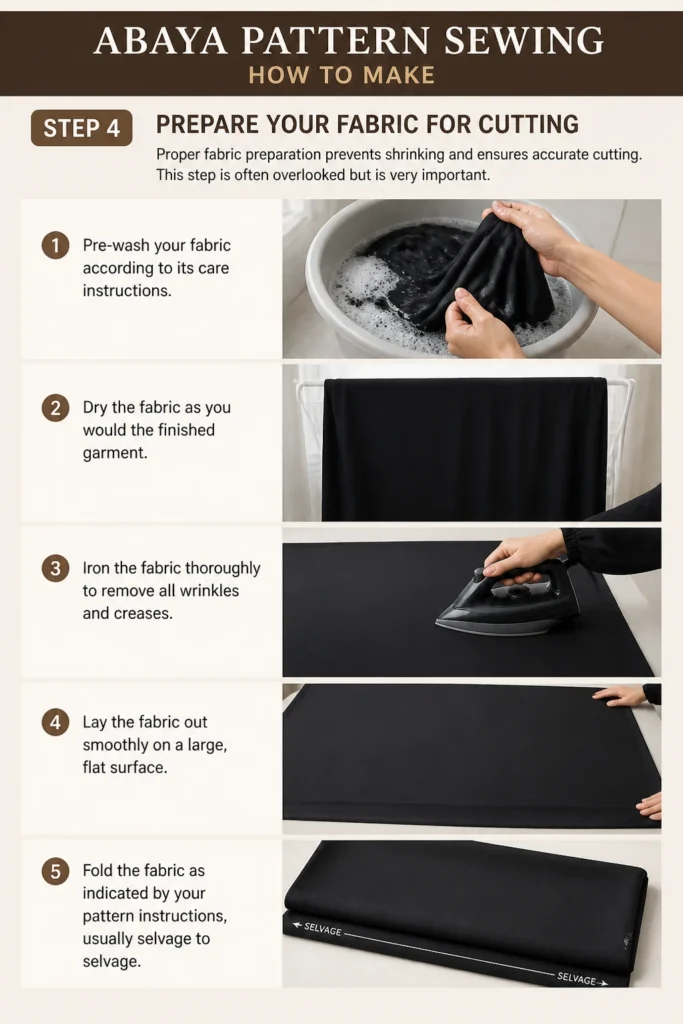
This step is often overlooked but is very important.
- Pre-wash your fabric according to its care instructions.
- Dry the fabric as you would the finished garment.
- Iron the fabric thoroughly to remove all wrinkles and creases.
- Lay the fabric out smoothly on a large, flat surface.
- Fold the fabric as indicated by your pattern instructions, usually selvage to selvage.
Step 5: Cut Your Pattern Pieces with Precision
Careful cutting ensures all your pieces will fit together correctly.
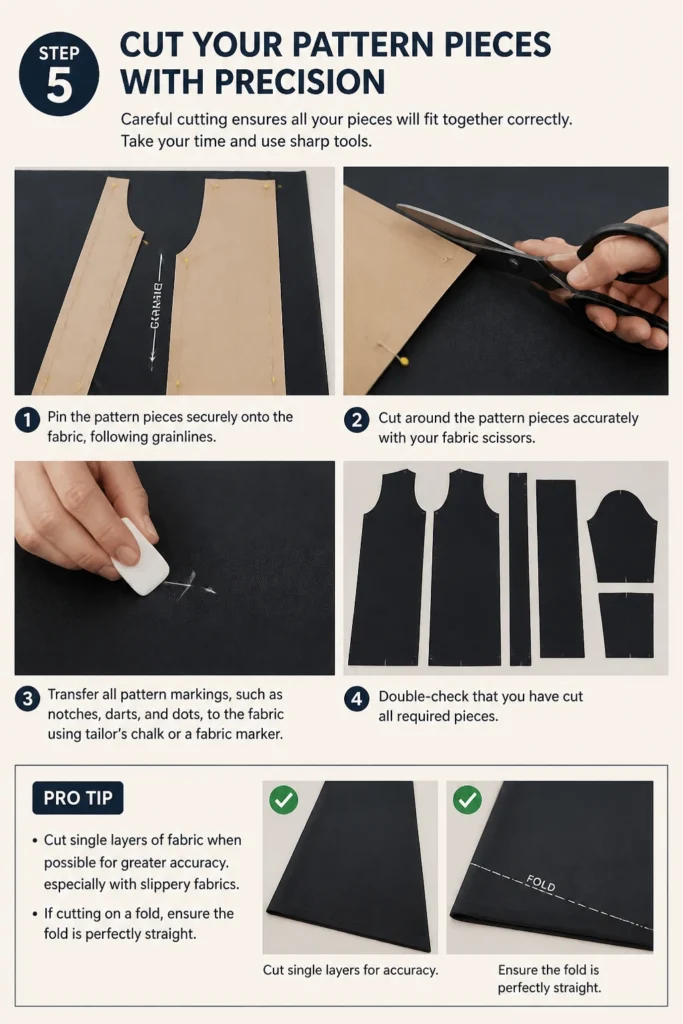
Take your time and use sharp tools.
- Pin the pattern pieces securely onto the fabric, following grainlines.
- Cut around the pattern pieces accurately with your fabric scissors.
- Transfer all pattern markings, such as notches, darts, and dots, to the fabric using tailor’s chalk or a fabric marker.
- Double-check that you have cut all required pieces.
Pro Tip: Cut single layers of fabric when possible for greater accuracy, especially with slippery fabrics. If cutting on a fold, ensure the fold is perfectly straight.
Step 6: Construct the Abaya’s Main Body
Begin assembling the core structure of your abaya.
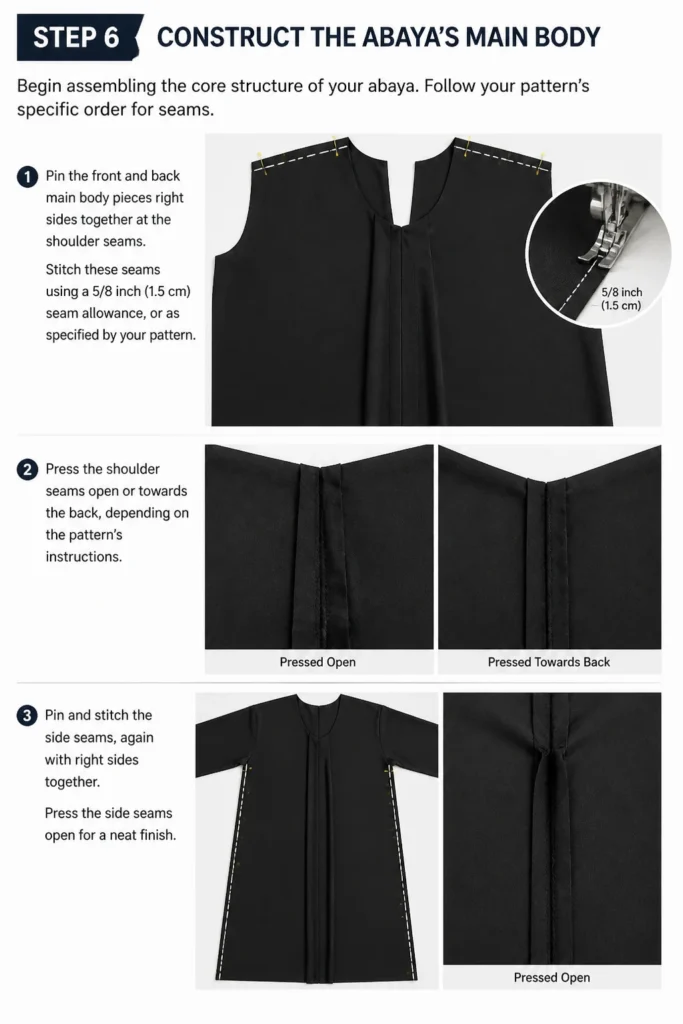
Follow your pattern’s specific order for seams.
- Pin the front and back main body pieces right sides together at the shoulder seams.
- Stitch these seams using a 5/8 inch (1.5 cm) seam allowance, or as specified by your pattern.
- Press the shoulder seams open or towards the back, depending on the pattern’s instructions.
- Pin and stitch the side seams, again with right sides together.
- Press the side seams open for a neat finish.
Step 7: Prepare and Attach the Sleeves
Sleeves require careful attention to ensure a smooth fit.
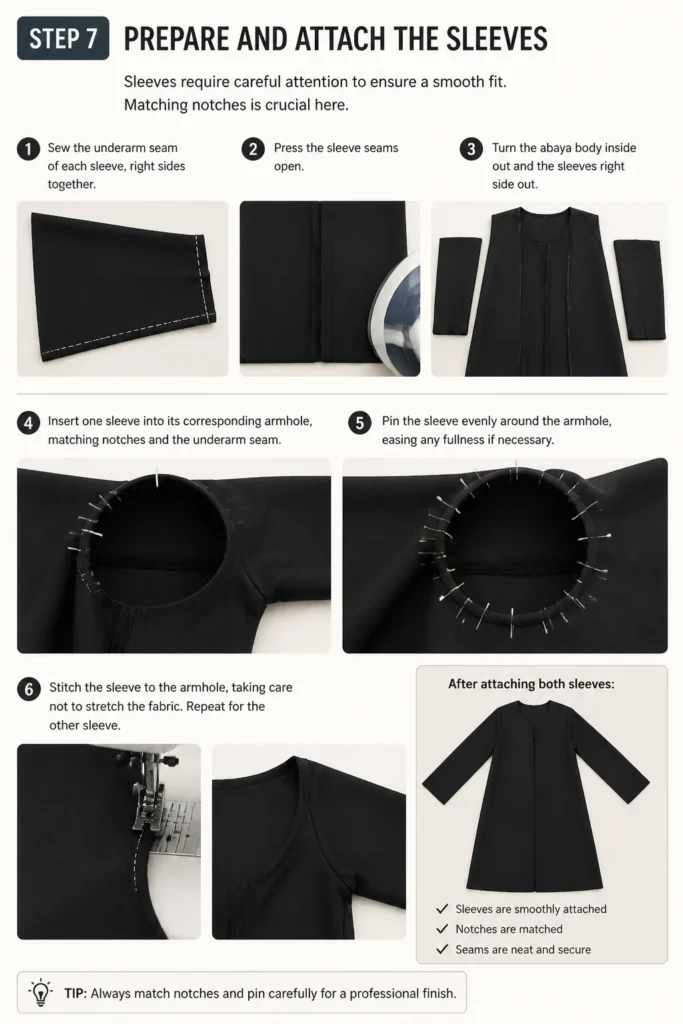
Matching notches is crucial here.
- Sew the underarm seam of each sleeve, right sides together.
- Press the sleeve seams open.
- Turn the abaya body inside out and the sleeves right side out.
- Insert one sleeve into its corresponding armhole, matching notches and the underarm seam.
- Pin the sleeve evenly around the armhole, easing any fullness if necessary.
- Stitch the sleeve to the armhole, taking care not to stretch the fabric.
- Repeat for the other sleeve.
Step 8: Finish the Neckline Neatly
A well-finished neckline elevates the entire garment.
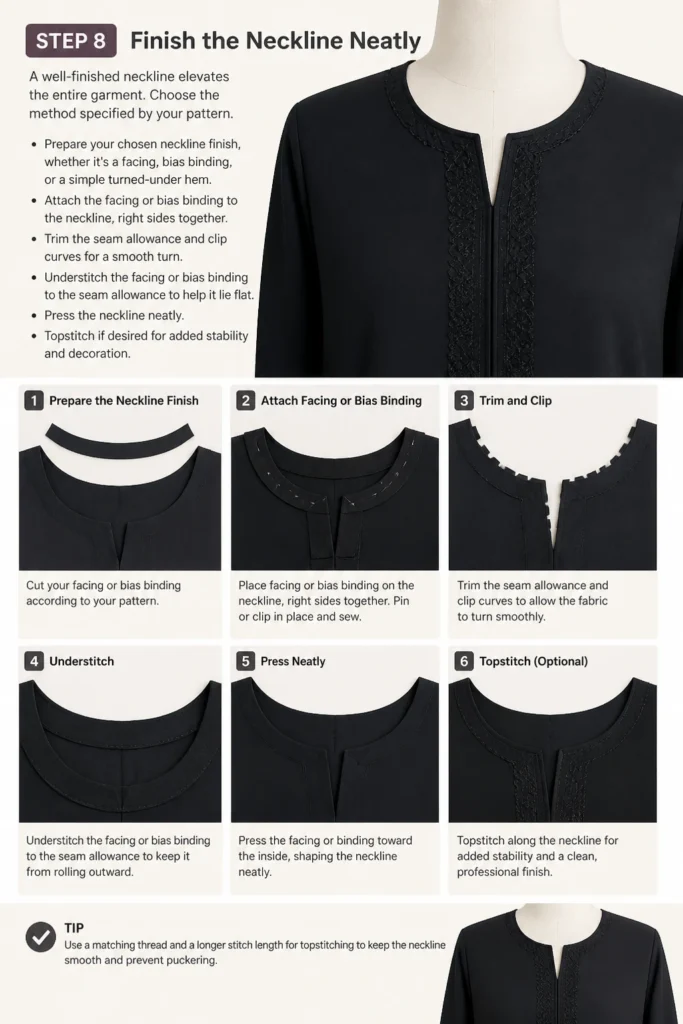
Choose the method specified by your pattern.
- Prepare your chosen neckline finish, whether it’s a facing, bias binding, or a simple turned-under hem.
- Attach the facing or bias binding to the neckline, right sides together.
- Trim the seam allowance and clip curves for a smooth turn.
- Understitch the facing or bias binding to the seam allowance to help it lie flat.
- Press the neckline neatly.
- Topstitch if desired for added stability and decoration.
Step 9: Hem the Abaya and Sleeves
The hem is one of the final steps and needs to be even and clean.
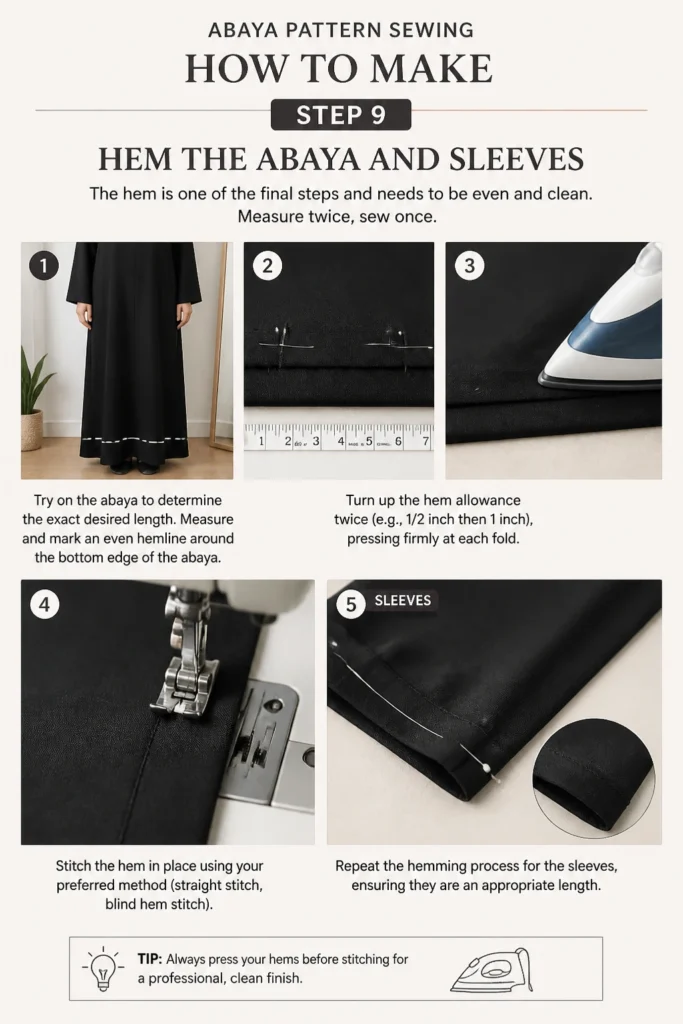
Measure twice, sew once.
- Try on the abaya to determine the exact desired length.
- Measure and mark an even hemline around the bottom edge of the abaya.
- Turn up the hem allowance twice (e.g., 1/2 inch then 1 inch), pressing firmly at each fold.
- Stitch the hem in place using your preferred method (straight stitch, blind hem stitch).
- Repeat the hemming process for the sleeves, ensuring they are an appropriate length.
Step 10: Perform Final Pressing and Inspection
The final press makes all the difference in a handmade garment.
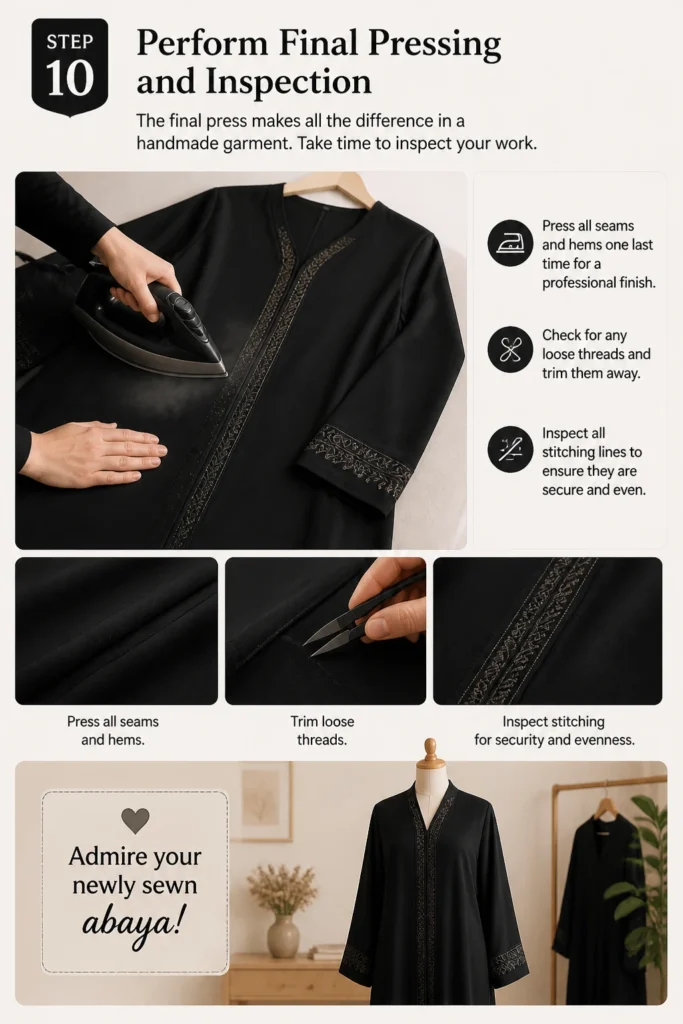
Take time to inspect your work.
- Press all seams and hems one last time for a professional finish.
- Check for any loose threads and trim them away.
- Inspect all stitching lines to ensure they are secure and even.
- Admire your newly sewn abaya!
Common Mistakes to Avoid
Incorrect Fabric Choice
Using the wrong fabric can significantly impact the abaya’s drape and comfort. A stiff fabric will make the abaya rigid, while a too-thin fabric might be see-through or not durable enough. Always check the pattern recommendations and consider the fabric’s weight, drape, and opacity for the best results.
Skipping Pre-Washing
Ignoring the pre-wash step can lead to a garment that shrinks unevenly after its first wash. Different fabrics have varying shrinkage rates. Always wash and dry your fabric exactly how you intend to wash the finished abaya to prevent any unpleasant surprises later.
Inaccurate Measurements and Cutting
A poorly fitting abaya often stems from incorrect body measurements or sloppy cutting. Rushing through these initial steps can lead to a garment that is too tight, too loose, or uneven. Take your time, measure carefully, and use sharp tools to ensure every piece is cut precisely.
Ignoring Seam Allowances
Consistent seam allowances are vital for a garment to fit together as intended. Deviating from the specified seam allowance can alter the garment’s size and shape. Always use the seam allowance indicated in your pattern and strive for uniformity throughout your stitching.
Troubleshooting
Abaya Doesn’t Drape Correctly
If your abaya feels stiff or doesn’t flow as you expected, the fabric choice might be the issue. Ensure you selected a fabric with good drape, such as crepe, Nida, or certain types of linen. Sometimes, using a softer interfacing in structured areas can help, but primarily, it comes down to the fabric’s inherent properties.
Sleeves Are Puffy or Twisted
Puffy or twisted sleeves often occur when they are not set in evenly or if the fabric was stretched during attachment. Double-check that all notches were matched correctly and that the sleeve cap was eased in smoothly. If there’s too much ease, consider running a second row of gathering stitches to distribute the fullness better before sewing.
Hemline Is Uneven
An uneven hemline is a common issue, especially with long garments. This can happen if the fabric was not laid out flat when cutting, or if the garment was not hung for 24 hours before hemming. For a precise hem, try on the abaya and have someone mark the desired length while you stand naturally. Use a reliable measuring tool to ensure an even distance from the floor all around.
Key Takeaways
- Accurate measurements are the foundation of a well-fitting abaya.
- Selecting the right fabric significantly impacts the final look and feel.
- Always pre-wash your fabric to prevent future shrinkage issues.
- Take your time with cutting and marking for precise assembly.
- Pressing seams as you go improves the overall finish and professionalism.
- Consistent seam allowances are essential for proper garment construction.
- Don’t rush the hemming process; an even hem makes a big difference.
Frequently Asked Questions
Can a beginner sew an abaya?
While an abaya involves several steps, a determined beginner can certainly tackle it. Start with a simple, A-line pattern without too many complex features. Focus on learning basic sewing techniques like straight stitching, pressing seams, and hemming. Patience and practice are your best tools.
What is the best fabric for an abaya?
The “best” fabric depends on your preference and climate. For good drape and comfort, popular choices include Nida fabric, various types of crepe (like Korean or Saudi crepe), high-quality linen, and brushed cotton. These fabrics are usually opaque, breathable, and have a beautiful fall.
How much fabric do I need for an abaya?
Fabric requirements vary greatly depending on the abaya pattern, your size, and the fabric width. Always refer to the yardage chart on your specific pattern envelope. As a general guide, a simple abaya might require 3-5 yards (2.7-4.5 meters) of 60-inch wide fabric.
How do I make my abaya fit perfectly?
To achieve a perfect fit, start by taking precise body measurements and comparing them to the pattern’s size chart. Consider making a muslin (a test garment from inexpensive fabric) to check the fit before cutting into your main fabric. Adjustments can then be made to the pattern pieces for a custom fit.
Our Top Recommended Finds
- High-Quality Fabric Shears: A sharp pair of fabric scissors makes cutting effortless and accurate, preventing frayed edges.
- Fabric Marking Pen Set: Includes water-soluble pens and tailor’s chalk for clear, temporary markings on various fabric types.
- Seam Ripper with Ergonomic Handle: Essential for correcting mistakes without damaging your fabric, an ergonomic handle reduces hand strain.
Craft Your Unique Abaya Today
You now have a detailed roadmap to creating your own beautiful abaya.
Embrace the journey of bringing your vision to life, stitch by careful stitch.
Gather your materials and begin your sewing project this week.