How To Use A Sewing Machine
Learning to use a sewing machine opens up a world of creative possibilities. It might seem intimidating at first, with all its knobs and levers. My own journey began with a borrowed machine and a lot of tangled thread, but with patience, anyone can master this skill. This guide will walk you through each essential step, building your confidence stitch by stitch.
Quick Overview
By the end of this guide, you will understand the basic parts of a sewing machine, how to thread it, and how to sew a simple straight seam. You’ll be ready to tackle your first small project with confidence.
- Time needed: 1-2 hours for initial setup and practice
- Difficulty: Beginner
- What you’ll need: A sewing machine, power cord, foot pedal, thread (top and bobbin), fabric scraps, a pair of sharp fabric scissors, pins, and a seam ripper.
Step-by-Step Instructions
Step 1: Get Familiar with Your Machine
Every sewing machine has core components, even if they look slightly different. Take a moment to locate the main parts before you start. Understanding these will make the following steps much clearer.
Identify the handwheel, which manually raises and lowers the needle. Find the spool pin, where your main thread spool sits.
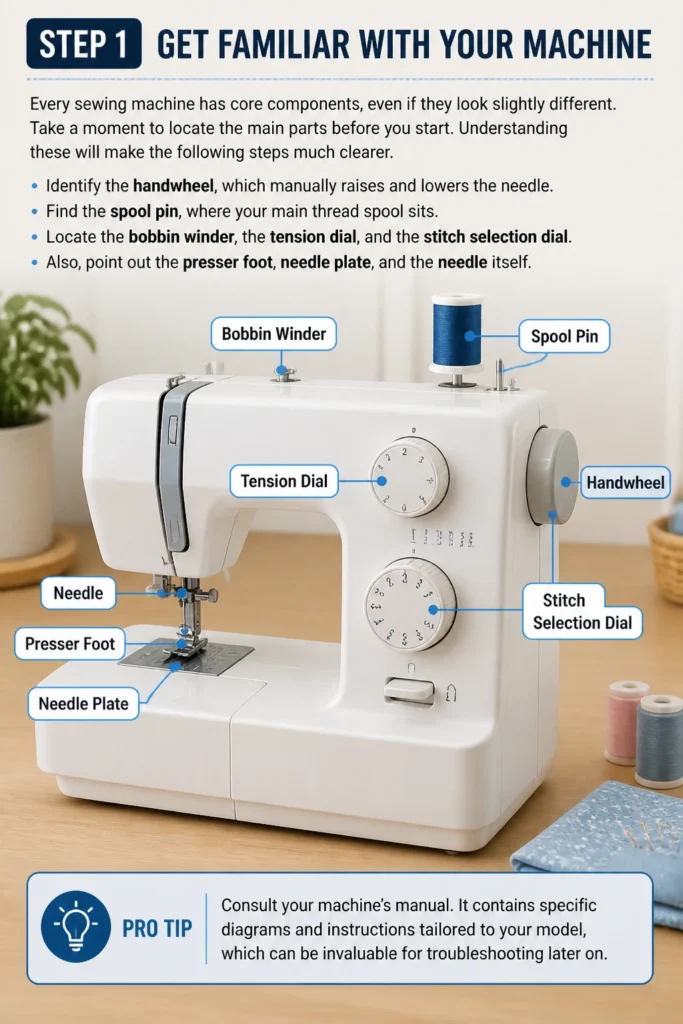
Locate the bobbin winder, the tension dial, and the stitch selection dial. Also, point out the presser foot, needle plate, and the needle itself.
Pro Tip: Consult your machine’s manual. It contains specific diagrams and instructions tailored to your model, which can be invaluable for troubleshooting later on.
Step 2: Wind the Bobbin
The bobbin holds the lower thread, which creates the stitches on the underside of your fabric. Winding it correctly is a critical first step for even stitches.
Place your spool of thread onto the spool pin. Follow the thread path indicated on your machine for bobbin winding, usually involving a tension disc.
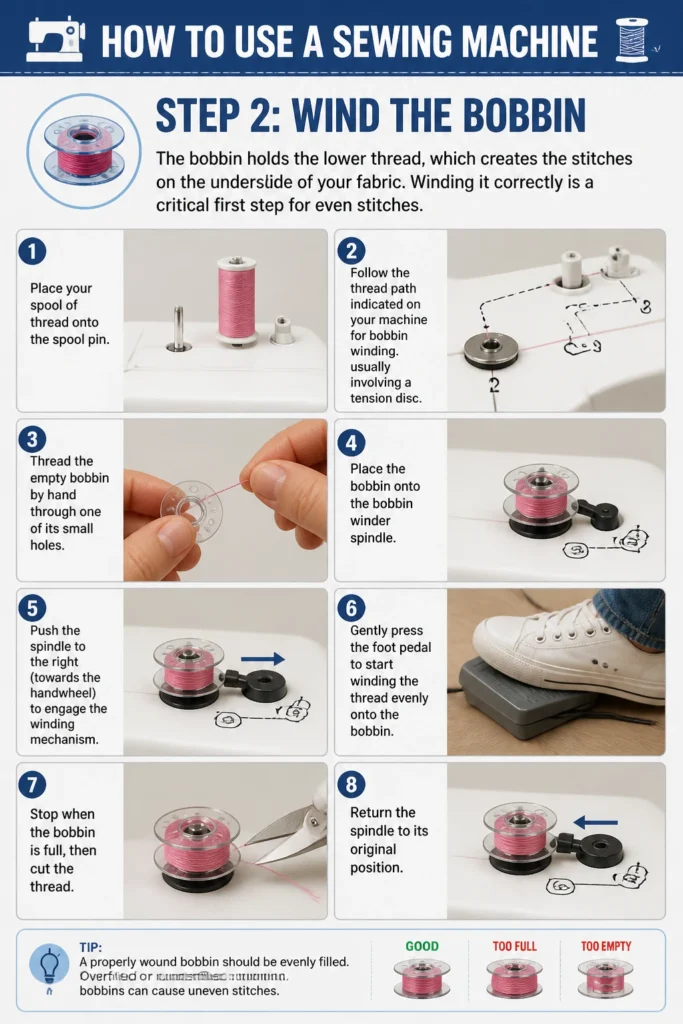
Thread the empty bobbin by hand through one of its small holes. Place the bobbin onto the bobbin winder spindle.
Push the spindle to the right (towards the handwheel) to engage the winding mechanism. Gently press the foot pedal to start winding the thread evenly onto the bobbin.
Stop when the bobbin is full, then cut the thread and return the spindle to its original position.
Step 3: Thread the Top Needle
This is often the most challenging part for beginners, but it becomes second nature with practice. Proper top threading prevents skipped stitches and tangles.
Raise the needle to its highest position using the handwheel. Lift the presser foot lever.
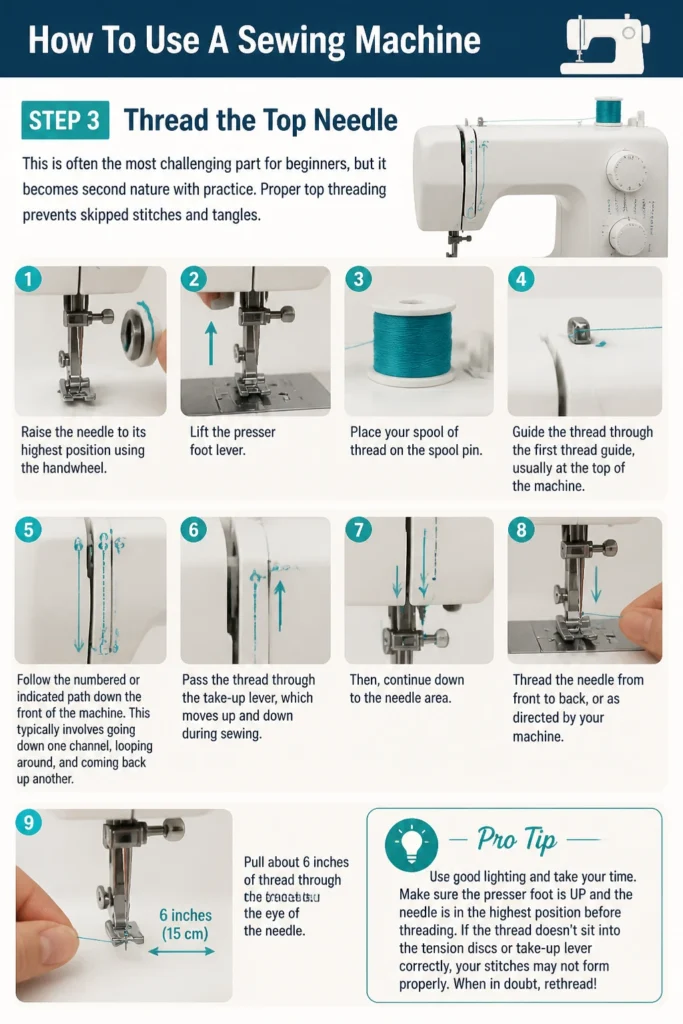
Place your spool of thread on the spool pin. Guide the thread through the first thread guide, usually at the top of the machine.
Follow the numbered or indicated path down the front of the machine. This typically involves going down one channel, looping around, and coming back up another.
Pass the thread through the take-up lever, which moves up and down during sewing. Then, continue down to the needle area.
Thread the needle from front to back, or as directed by your machine. Pull about 6 inches of thread through the eye of the needle.
Pro Tip: Use a needle threader if your machine has one, or a handheld one. It saves a lot of eye strain!
Step 4: Insert the Bobbin
With the bobbin wound and the top threaded, it’s time to get the lower thread ready. Most machines have either a front-loading or a drop-in bobbin system.
For a drop-in bobbin, open the bobbin cover plate near the needle. Place the bobbin into its casing, ensuring the thread unwinds in the correct direction (usually counter-clockwise).
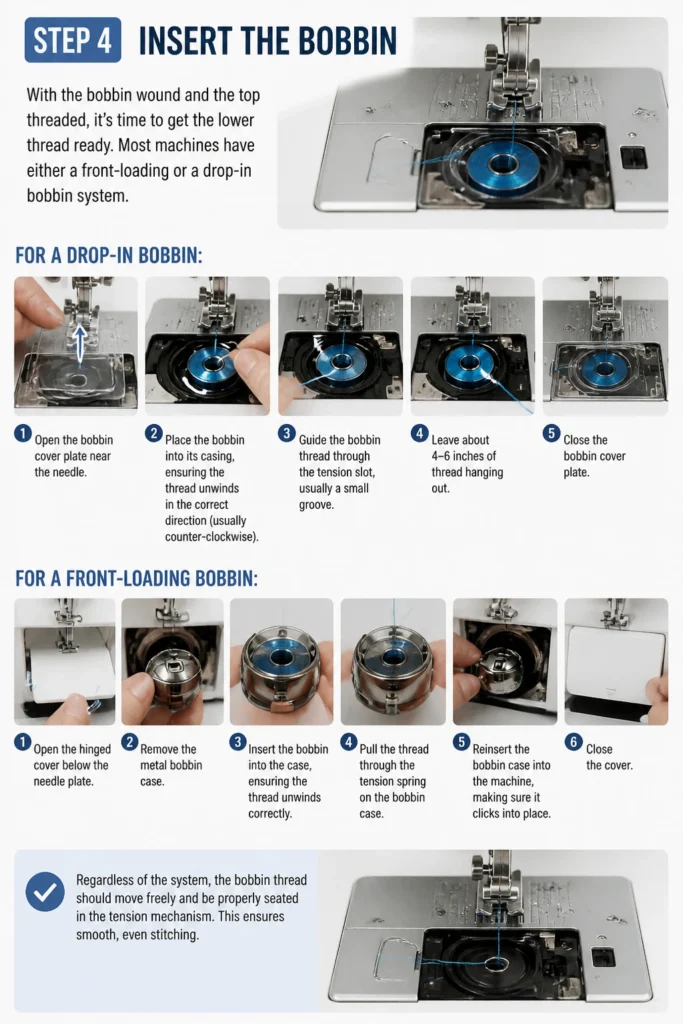
Guide the bobbin thread through the tension slot, usually a small groove. Leave about 4-6 inches of thread hanging out.
For a front-loading bobbin, open the hinged cover below the needle plate. Remove the metal bobbin case.
Insert the bobbin into the case, ensuring the thread unwinds correctly. Pull the thread through the tension spring on the bobbin case.
Reinsert the bobbin case into the machine, making sure it clicks into place. Close the cover.
Regardless of type, hold the top thread loosely. Turn the handwheel towards you, lowering and then raising the needle. The needle will catch the bobbin thread.
Pull the top thread gently. This will bring a loop of the bobbin thread up through the needle plate hole. Use a pin or your fingers to pull this loop fully out.
Pull both the top and bobbin threads to the back of the machine, under the presser foot.
Step 5: Prepare Your Fabric
Before you sew, you need to prepare your fabric. This ensures straight seams and accurate results.
Cut your fabric scraps to a manageable size, perhaps 6×6 inches. Press them flat with an iron if they are wrinkled.
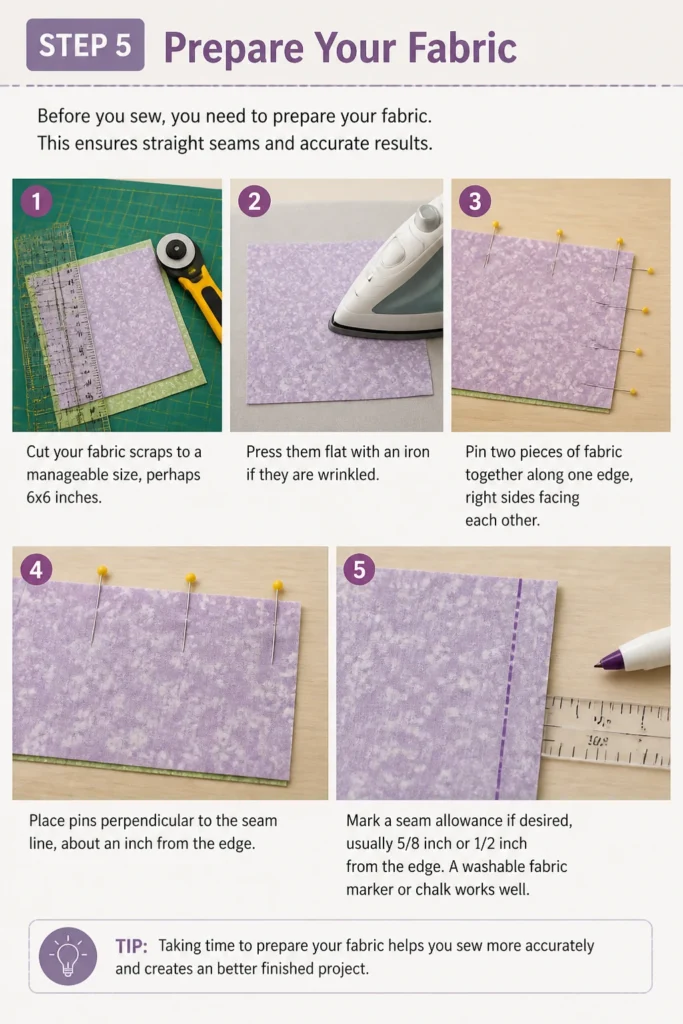
Pin two pieces of fabric together along one edge, right sides facing each other. Place pins perpendicular to the seam line, about an inch from the edge.
Mark a seam allowance if desired, usually 5/8 inch or 1/2 inch from the edge. A washable fabric marker or chalk works well.
Step 6: Adjust Settings
Your sewing machine has various settings that control the look and strength of your stitches. Start with basic settings.
Select a straight stitch on your machine, typically indicated by a straight line icon. Set the stitch length to a medium setting, often around 2.5.
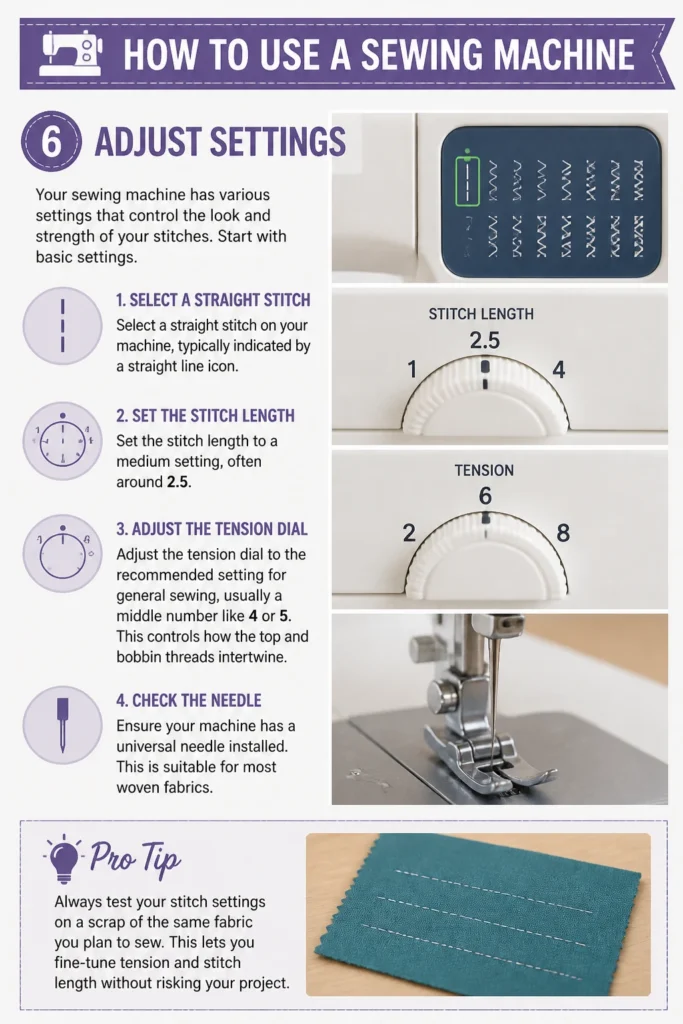
Adjust the tension dial to the recommended setting for general sewing, usually a middle number like 4 or 5. This controls how the top and bobbin threads intertwine.
Ensure your machine has a universal needle installed. This is suitable for most woven fabrics.
Pro Tip: Always test your stitch settings on a scrap of the same fabric you plan to sew. This lets you fine-tune tension and stitch length without risking your project.
Step 7: Start Sewing!
You’re ready for your first stitches. Control the speed with the foot pedal and guide the fabric gently.
Place your fabric under the presser foot, aligning the edge with your desired seam allowance guide on the needle plate. Lower the presser foot.
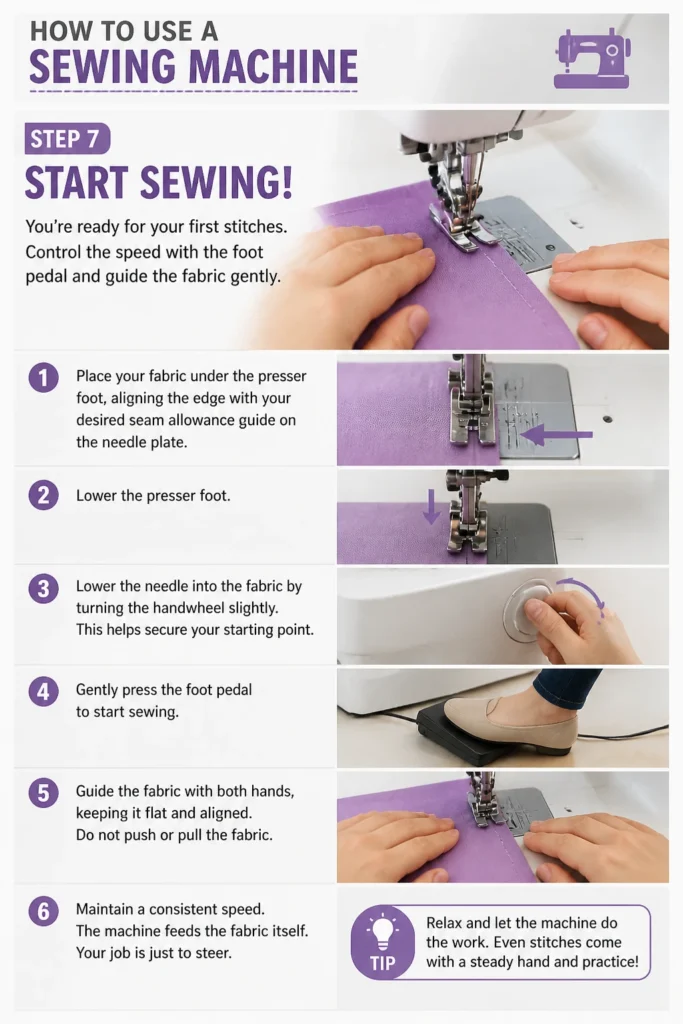
Lower the needle into the fabric by turning the handwheel slightly. This helps secure your starting point.
Gently press the foot pedal to start sewing. Guide the fabric with both hands, keeping it flat and aligned. Do not push or pull the fabric.
Maintain a consistent speed. The machine feeds the fabric itself. Your job is just to steer.
Step 8: Finish Your Seam
Properly securing the beginning and end of your seam prevents stitches from unraveling.
When you start sewing, sew a few stitches forward, then press the reverse stitch lever or button. Sew a few stitches backward over your starting stitches.
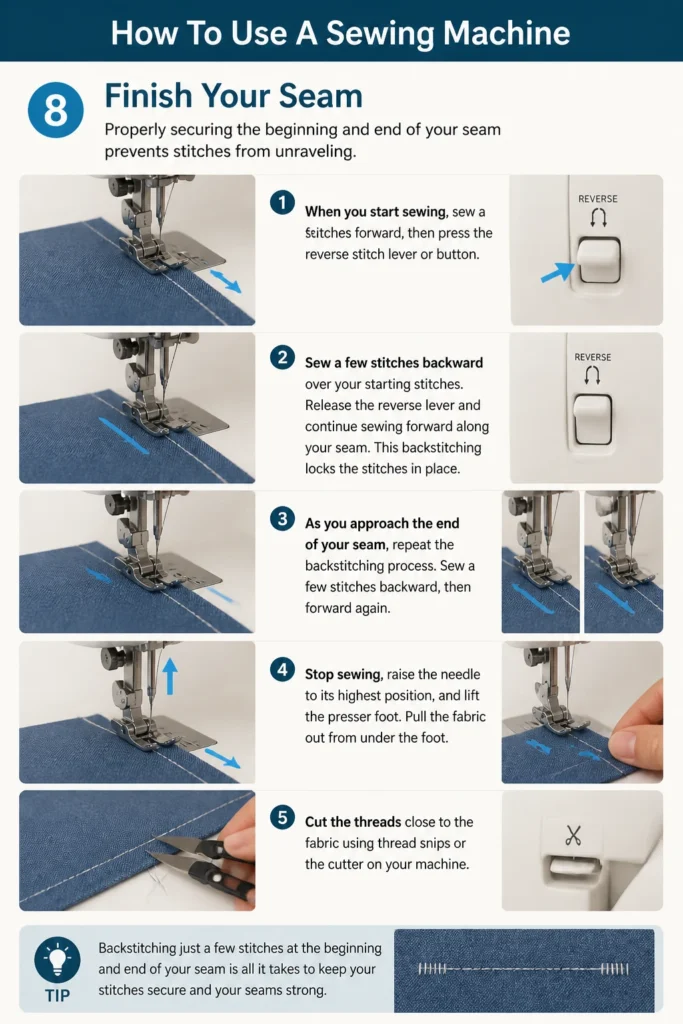
Release the reverse lever and continue sewing forward along your seam. This “backstitching” locks the stitches in place.
As you approach the end of your seam, repeat the backstitching process. Sew a few stitches backward, then forward again.
Stop sewing, raise the needle to its highest position, and lift the presser foot. Pull the fabric out from under the foot.
Cut the threads close to the fabric using thread snips or the cutter on your machine.
Step 9: Practice and Refine
Your first stitches might be wobbly, and that’s perfectly normal. Sewing is a skill that improves with consistent practice.
Continue practicing straight lines on fabric scraps. Try sewing curves or corners once you feel comfortable with straight stitches.
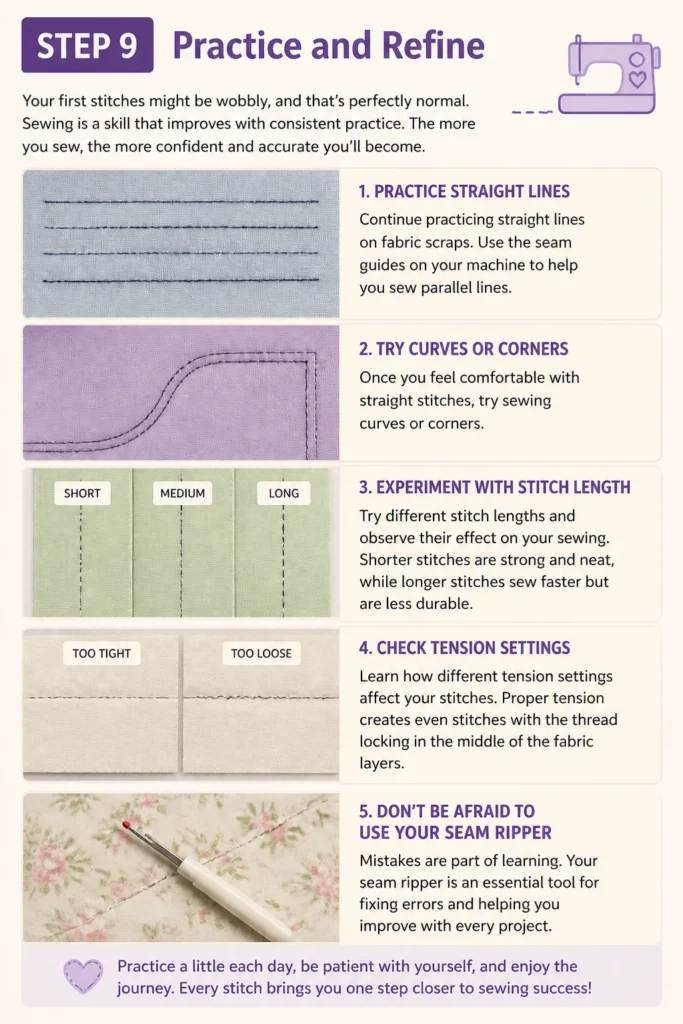
Experiment with different stitch lengths and observe their effect. Learn how different tension settings affect your stitches.
Don’t be afraid to use your seam ripper. It’s an essential tool for learning and correcting mistakes.
Common Mistakes to Avoid
Incorrect Threading
Many sewing machine problems stem from incorrect threading, either of the top thread or the bobbin. If the thread skips guides or isn’t seated properly in the tension discs, your stitches will be uneven, loose, or even completely absent. Always re-thread from scratch if you suspect an issue, ensuring the presser foot is up when threading the top.
Using the Wrong Needle
A dull or incorrect needle can cause skipped stitches, fabric snags, or even needle breakage. Needles come in different sizes and types for various fabrics. For general sewing, a universal needle is fine, but for knits, denim, or delicate fabrics, use a specialized needle. Change your needle after every 8-10 hours of sewing or if you hear a popping sound.
Pulling the Fabric
It’s tempting to pull the fabric through the machine, especially if it seems to be struggling. However, the feed dogs under the presser foot are designed to move the fabric at a consistent rate. Pulling can bend the needle, damage the machine, or result in stretched and distorted seams. Gently guide the fabric, letting the machine do the work.
Neglecting Backstitching
Skipping the backstitching at the beginning and end of a seam is a common oversight. Without these locking stitches, your seam can easily unravel, especially under stress or during washing. Always take those few extra stitches to secure your work.
Troubleshooting
Skipped Stitches
If your machine is skipping stitches, the most common culprits are incorrect threading, a dull needle, or the wrong needle type for your fabric. Re-thread both the top and bobbin carefully, ensuring all guides are engaged. Replace your needle with a new, appropriate one for your fabric.
Thread Breaking
Thread breakage can be frustrating. Check if the top thread is catching on a rough spot on the spool or machine. Ensure the thread is not too old or brittle. Incorrect tension (too tight) or a burr on the needle eye can also cause thread to snap. Try loosening the top tension slightly and inspect your needle.
Fabric Jamming or Bunching
Fabric bunching up under the needle often indicates an issue with bobbin threading or tension. Make sure the bobbin is inserted correctly and its thread is securely in the tension spring. Also, check that the presser foot is down; sewing with the foot up will always cause a bird’s nest of thread. Sometimes, very thin or slippery fabrics might need a walking foot attachment.
Key Takeaways
- Familiarize yourself with your machine: Understand its parts and consult the manual.
- Master threading: Correct top and bobbin threading is fundamental for good stitches.
- Always test first: Use scrap fabric to check tension and stitch settings.
- Guide, don’t pull: Let the machine’s feed dogs move the fabric.
- Backstitch to secure: Lock your seams at the beginning and end.
- Practice consistently: Sewing is a skill that improves with time and repetition.
Frequently Asked Questions
What is the best type of thread for beginners?
All-purpose polyester thread is excellent for beginners. It’s strong, durable, and suitable for a wide range of fabrics. Cotton thread is also a good option, especially for projects made from 100% cotton fabric.
How often should I change my sewing machine needle?
It’s recommended to change your needle after every 8-10 hours of sewing or at the start of a new project. A dull or bent needle can cause fabric damage, skipped stitches, and thread breakage.
Why is my sewing machine making a loud noise?
A loud or unusual noise often indicates that your machine needs cleaning and oiling, or there might be a thread jam. First, check for any tangled threads in the bobbin area or around the needle. If clear, refer to your manual for cleaning and oiling instructions.
Can I use any fabric with my sewing machine?
Most home sewing machines can handle a variety of fabrics, from light cottons to denim. However, very thick materials (like multiple layers of upholstery fabric) or very delicate ones (like chiffon) might require specialized needles, presser feet, or even a heavy-duty machine. Always test on a scrap first.
Our Top Recommended Finds
- All-Purpose Polyester Thread Assortment: A good range of basic colors ensures you always have the right thread on hand for various projects.
- Universal Sewing Machine Needles Set: Having a pack with different sizes (e.g., 80/12, 90/14) allows you to adapt to various fabric weights effectively.
- Fabric Shears: A dedicated pair of sharp fabric scissors makes cutting fabric much easier and more precise, preventing fraying and uneven edges.
Your Sewing Adventure Begins Now
You now have the fundamental knowledge to confidently approach your sewing machine. Don’t let initial challenges deter you. Every skilled seamstress started exactly where you are today.
Take out your machine, thread it up, and start practicing those straight lines. Soon, you’ll be creating simple projects like pillowcases, tote bags, or even mending clothes with ease. Embrace the process, enjoy the creativity, and watch your skills grow with every stitch.